January 31, 2015

Snow and sun in Amsterdam

WANDELEN IN AMSTERDAM MET SNEEUW

Finally snow in Amsterdam! Yay! Not a big snowfall, but snow afterall. Is the first time that I've seen snow since I live here. And, let's be honests, snow is not comfortable at all, everything is slippery and snow turns into a grey mess and your feet get totally wet... but... it's so nice... specially in Amsterdam where everything is so very nice... and while I'm writing this, it's snowing again :)

Por fin! Qué ganas tenía de nieve. Es la primera vez, desde que vivo en Amsterdam, que he tenido la oportunidad de pasear con un poco de nieve por la calle. Aunque en realidad no es nada cómodo ni agradable, todo resbala y la nieve se va poniendo gris a medida que se va derritiendo... pero... ha nevado :)

He estado horas andando con los calcetines empapados lo que seguro que me va a garantizar un par de semanas más del catarro que arrastro ya casi un mes y medio, pero ha merecido la pena, mi retina está feliz. Amsterdam está precioso siempre y con nieve aún más. Y mientras escribo esto está nevando otra vez.


January 29, 2015

My crochet diamonds pillow

DIAMONDS ARE FOREVER

You know that I'm very fond of crochet pillows. It's the perfect project, not as big as a blanket, but big enough to enjoy the designing and making process. I use a pillow cover as a base and just sew the crochet work to it. This way I avoid making my own cover and adding the zipper and all this stuff ...

Ya sabéis que soy muy fan de los cojines de ganchillo. Me parecen el proyecto perfecto, no tan gigante como una colcha, pero del tamaño suficiente para divertirse con el diseño y el proceso. Además yo lo que hago es comprar un cojín y una funda baratos y aplicarle el trabajo de ganchillo, con lo cual me ahorro el hacer yo misma la funda y andar poniendo cremalleras y todo ese follón...


This is the last one I've finished. As in my last posts we've seen how to crochet triangles and diamonds I've thought that this could be a nice project for you to practice your new skills.

Este es el último que he terminado. Aprovechando que llevo unas semanas enseñándoos cómo tejer triángulos y rombos de ganchillo, aquí tenéis este proyecto super fácil y entretenido para que pongáis en práctica vuestros nuevos conocimientos.


To make this pillow you'll need: 50cmx50cm (20"x20") Ikea pillow, Gurli Ikea cover, cotton in black, white, grey, red, mint and lime. Crochet hook 3mm, tapestry needle.

Los materiales que he utilizado son los siguientes: Un cojín de Ikea de 50cmx50cm, una funda GURLI de Ikea. Para tejer, algodón en color negro, gris, rojo, crudo, lima y menta. Aguja de ganchillo nº3, aguja lanera para unir las piezas.


Crochet the following pieces (my triangle base is 22 sc):

23 diamonds (see tutorial here): 4 black, 5 grey, 8 white, 2 red, 2 lime, 2 mint
4 half-dimonds (see tutorial here): 2 white, 1 grey, 1 lime
8 triangles (see tutorial here): 3 grey, 1 mint, 2 white, 1 red, 1 black
4 half-triangles (see tutorial here): 2 grey, 2 white

Colors and amount of pieces per color are just a suggestion, try to make your own cambinations and you would like the pillow even better.

Tejed las siguientes piezas (las mías tienen una base de 22 puntos, es decir ese es el punto medio de los rombos y la base de los triángulos) :

23 rombos (ver tutorial aquí): 4 negros, 5 grises, 8 crudos, 2 rojos, 2 lima y 2 menta.
4 medios rombos (ver tutorial aquí): 2 crudo, 1 gris, 1 lima
8 triángulos (ver tutorial aquí): 3 grises, 1 menta, 2 crudos, 1 rojo, 1 negro
4 medios triángulos (ver tutorial aquí) : 2 grises, 2 crudos

Evidentemente los colores y los números de piezas por color son simplemente una sugerencia, probad vuestras propias combinaciones y el cojín os gustará más aún.


Now you just have to put your pieces together, make the puzzle and sew it with your tapestry needle. Depending on your gauge your piece my be a little bigger than the cover, don't worry about that. Just make a little hem and it would be perfect!

Ahora sólo te queda montar el puzzle, une tus piezas con la aguja lanera y aplica la pieza entera a la funda del cojín. A mi me quedó un poco más grande la pieza de ganchillo que la funda del cojín, pero al unirlo he hecho unos dobladillos para ajustarlo todo y ha quedado perfecto.

January 23, 2015

How to crochet diamonds

Some weeks ago we learnt how to crochet sc triangles, from the base and from the top. Now we're going to see how to crochet single crochet diamonds, which actually is a combination of both techniques.

Hace unas semanas vimos cómo tejer triángulos a ganchillo, empezando tanto desde la base como desde la punta. Hoy vamos a ver cómo tejer rombos de ganchillo a punto bajo, que se trata ni más ni menos de combinar los dos sistemas de hacer triángulos.


Start crocheting a triangle from the top, crocheting 2 sc in the first sc in every round, that's to say increasing 1 sc in each round. If you don't know how to do it, here you have the tutorial.

Empieza tejiendo un triángulo desde la punta, hasta alcanzar el tamaño deseado. Recuerda que para ello en cada fila hacemos dos puntos bajos en el primer punto, es decir hacemos un aumento en cada fila. Si no sabes cómo hacerlo, aquí tienes el tutorial.


And now, start working the triangle from the base, skip the first sc in every round, that's to say, decrease 1 sc in every round since ther'es only 1 sc keft. If you don't know how to do it, here you have the tutorial. That's it! Your diamond is done!

Y ahora empieza a tejer el triángulo al revés, desde la base hacia la punta hasta que sólo te quede un punto. Recuerda que esto se consigue saltándose el primer punto de cada fila, es decir disminuyendo un punto en cada fila. Si no sabes cómo hacerlo puedes ver el tutorial aquí. Ya tienes tu rombo hecho....


As for the triangle, if you're planning a square shaped project you'll need some extra pieces, like the half-diamond very similar to the half-triangle. Start working a half triangle from the top, increasing every other round and once you've reached the desired length start working from the base, decreasing every other round. (See how to crochet the half triangle here)

Al igual que con el triángulo, si quieres hacer un proyecto con rombos que tenga una forma cuadrada o rectangular, vas a necesitar de otras piezas para conseguirlo. Una de ellas es el medio rombo, muy parecido al medio triángulo que ya vimos anteriormente. Para ello seguimos el mismo procedimiento, tejemos medio triángulo empezando por la punta, aumentando una fila si y una no, y al llegar a la base empezamos a disminuir una fila si y una no.


Now you know how to crochet all the different pieces that you'll need to crochet a square shaped project with diamonds, like a pillow or a blanket. Combine shapes and colours, be creative!

Ahora ya sabes tejer todas las piezas necesarias para hacer un proyecto con rombos al que quieras darle un acabado cuadrado, como un cojín o una colcha. Combina las formas y los colores y empieza a crear!

January 20, 2015

Winter crochet inspiration

It's so cold outside! I'd rather stay at home crocheting

HACE MUCHO FRÍO!!


Here you'll find some nice ideas to crochet and keep yourself warm during the winter. Some of them include pattern, some others are just for inspiration, but all of them are made by amazing crafters and designers.

Hoy os traigo algunas bonitas ideas para tejer y manteneros calentit@s este invierno. Algunas incluyen patrón, otras son sólo para inspirarte, pero todas son especiales.


Bueno, y como bonus extra LA BATAMANTA DE GANCHILLO! Quién se anima a hacerse una? 


More winter inspiration in my Winter Crochet board in Pinterest

January 16, 2015

First day of class, Proyecto Colcha Amsterdam 2015

I love the first day of class... new materials, new people, new teacher... oops, no, wait, I'm the teacher... 

Por fin empezamos una nueva temporada en Proyecto Colcha Amsterdam. Con caras conocidas y caras nuevas (todas guapísimas, por supuesto) y más caras nuevas que vendrán la semana que viene. Esto se anima, y es que ya sabemos que tejer y rascar... todo es empezar... 


The new season of Proyecto Colcha Amsterdam has been officially inaugurated. New girls and not so new friends, a nice table with tulips and cake... and of course the family (Kleine Louis & co. ) at the bottom, watching very curiously what's happening here...

Les he puesto a las chicas la mesa bien bonita, con un muestrario de cosas que vamos a aprender a hacer, con unos tulipanes, que aquí en Amsterdam no pueden faltar, y con un buen bizcocho, que el ganchillo da mucha hambre. Al fondo veis a la familia cotilleando, no se pierden detalle los tíos, madre mía...


First day is not easy, I know that... but I'm happy if you can just hold the hook in one hand and the yarn on the other, this is enough... The important thing is to have a nice time. I love to see your faces fighting with your first chains....

El primer día no es fácil, lo se... me conformo con que aprendáis a sostener el gancho en una  mano y la lana en la otra..., que ya es bastante... Lo importante es que lo pasemos bien. Yo me parto de risa con las caras que ponen luchando con las primeras cadenetas. Hoy hemos llegado casi hasta las lágrimas!


Crochet is not a one day thing, you need some days to get used and soon your hook will move alone. I've seen the most nervous and impatient people change dramatically, you learn how to be patient. Crochet is about valuing the moment, every stitch is important, every stitch has it role in the whole work... and you learn this, you can feel it... Look at their concentration faces, they're so cute...

Esto del ganchillo es como todo, necesitas unos días de adaptación, luego la aguja va sola. Yo he visto cambios impresionantes en alumnas mías. Gente muy nerviosa, sin paciencia ninguna, que el primer día casi se dedicaban a hacer nudos en la lana, en vez de tejerla, y ahora son tejedoras profesionales que han conseguido desarrollar su paciencia y concentración y han aprendido a relajarse con una actividad creativa y manual como es el crochet. Mira las caras de concentración que tienen, qué bonicas son...


I love being a crochet teacher, what else can I say...

Yo que os voy a decir, si ya os lo he dicho muchas veces, dar clases de ganchillo es lo que mas me gusta en el mundo (después de tejer mientras veo pelis de domingo), soy feliz viendo como evolucionáis, compartiendo estos momentos y viendo como poco a poco os convertís en fanáticas ganchilleras, como yo...

PROYECTO COLCHA 
CROCHET LESSONS IN AMSTERDAM


Ahora que ya has decidido unirte a nosotros, sólo tienes que escribirme y te informaré de los horarios y precios actuales. Este es mi email: 
proyectocolcha@gmail.com 
En español e inglés!

Lessons are once a week, twoo hours per lesson. If you want to know about prices and timetables, please contact me in:
 proyectocolcha@gmail.com
In Spanish and English!

January 14, 2015

Proyecto Colcha Amsterdam, New Season

You want to learn how to crochet and I know it... You want to crochet a granny squares blanket and I know it... You want to join the Proyecto Colcha Amsterdam.... and I know it!

COME CROCHET WITH ME! 

It's so cold outside... winter is here. Let's stay at home and crochet together.


Siempre has querido hacerte una colcha de aplicaciones de ganchillo, pero no te atreves a empezar? Ven con nosotras y te enseñamos! Aprenderás cada día una nueva aplicación y haremos juntos nuestras colchas! Si no sabes ganchillo, pero te mueres de ganas de aprender... aprenderás! Se verán todo tipo de puntos y técnicas, el ganchillo ya no tendrá secretos para ti...

We know you love crochet blanketsafghans and Granny Squares, so come and join us and you'll learn everyday one new granny to add to your very own crochet blanket. You'll also learn a lot of different techniques and stitches, how to read patterns, amigurumi, tunisian crochet, tapestry crochet... a whole new world is waiting for you! :)

Materiales: Aguja de ganchillo nº 3, nº 3,5 , o nº4. Lanas de colores (mínimo unos 5 o 6 colores), indicadas para el número de aguja que tengas. (Si empiezas de cero no te recomiendo colores muy oscuros como negro o azul marino). Marcadores. Aguja lanera ( es una aguja de coser pero con la punta redondeada, que no pincha) Cinta métrica. Tijeras. Cuaderno y bolígrafo.

You'll need: Crochet hook 3, 3,5 or 4. Wool (5 or 6 colours minimum). stitch markers, tapestry needle, scissors, measuring tape, notebook and pen.

Taller impartido por De Estraperlo

Reserva tu plaza ya!

Ahora que ya has decidido unirte a nosotros, sólo tienes que escribirme y te informaré de los horarios y precios actuales. Este es mi email: proyectocolcha@gmail.com En español e inglés!

Lessons are once a week, twoo hours per lesson. If you want to know about prices and timetables, please contact me in proyectocolcha@gmail.com. In Spanish and English!

January 9, 2015

How to crochet triangles

Two different ways to crochet sc triangles


A  few months ago we saw how to crochet double crochet triangles to make a crochet garland for your birthday, do you remember? Today we're going to learn how to crochet sc triangles, both from the top and from the base. If you're planning to make a square shaped project, like a pillow or a blanket, you would need an extra piece to get the square shape, a half-triangle, so we're also going to learn how to crochet it.

Hace unos meses os enseñé a tejer unos triángulos de punto alto y con ellos hicimos unas banderolas para decorar tu fiesta de cumpleaños, recuerdas? Hoy vamos a ver cómo hacer triángulos en punto bajo, y además de dos formas distintas, empezando por la base y empezando por la punta. Además, si quieres tejer un proyecto de triángulos y que este quede de una forma cuadrada o rectangular, necesitarás un medio triángulo para cuadrar, así que vamos a verlo también.


How to crochet a sc triangle from the base: crochet a chain as long as you want the triangle to be (if you're going to use the half-triangle you'd better crochet an even number of sc). For example, chain 19, and crochet 18 pb. 
From now on we'll work every round as follows: chain 1, skip the first sc, sc in second sc, (see picture below), sc in every sc till the end of the round. (We're decreasing 1 sc in every round.)

Para tejer un triángulo de punto bajo empezando por la base, tejemos una cadeneta tan larga como queramos de grande el triángulo. (Os recomiendo un número par de puntos bajos si luego queréis formar cuadrados o rectángulos usando el medio triángulo). En este caso vamos a hacer, por ejemplo, 18 puntos bajos, por lo tanto tejemos 19 cadenetas. A continuación tejemos una fila de punto bajo (18 pb). 
A partir de ahora tejeremos cada fila de la siguiente forma: Primero haremos una cadeneta, como siempre que empezamos una fila de puntos bajos. A continuación nos saltaremos el primer pb donde tejeríamos normalmente, y nos vamos directamente al segundo (en la foto de abajo lo veréis señalado con una flecha) De esta forma estamos disminuyendo un pb en cada fila.


Keep crocheting this way, decreasing a sc per round until there's only 1 sc left and your triangle is finished!

Seguimos tejiendo con este sistema, disminuyendo un pb por fila, hasta que nos quede un sólo pb, y nuestro triángulo estará terminado!


How to crochet a sc triangle from the top: chain 2, crochet 2 sc in the second chain from the hook, as you see in the picture below. From now on we'll work every round as follows: chain 1, 2 sc in first sc, 1 sc in each sc. We're increasing 1 sc in every round.

Para tejer un triángulo de punto bajo empezando por la punta, tejemos dos cadenetas y dos pb en la segunda cadeneta desde el gancho, como veis en la foto de abajo. A partir de ahora tejeremos cada fila de la siguiente forma: Primero haremos una cadeneta, como siempre que empezamos una fila de puntos bajos. A continuación en el primer pb tejeremos 2 pb, y seguiremos la fila normalmente, tejiendo un pb en cada pb. De esta forma estaremos aumentando 1 pb por cada fila. 


Once you've reached the desired length (18 sc in our example) stop crocheting and You're done! As in the other way to crochet a triangle, you'd better choose an even number if you're going to use half-triangles in your project.

Cuando llegues a un tamaño de triángulo que te guste (en nuestro ejemplo a 18 pb) paras y punto! Como en el sistema anterior, te recomiendo que el número de pb sea par en el caso de que quieras hacer un proyecto de forma cuadrada o rectangular usando medios triángulos.


HOW TO CROCHET HALF TRIANGLE

To crochet the half-triangle follow the same technique than crocheting the whole triangle but increasing or decreasing only in alternate rounds, in every other one. This would made one of the sides stay straight while the other will keep increasing or decreasing, depending if we're starting from the top or the base.

CÓMO TEJER MEDIO TRIÁNGULO

El procedimiento es el mismo que para el triángulo, sólo que en vez de hacer el aumento o la disminución en cada fila lo haremos en filas alternas, una sí una no. Eso hará que uno de los lados siempre esté igual y quede recto, mientras que el otro irá aumentando o disminuyendo según el sistema que empleemos.


Starting from the base, you will crochet half the pb than for the whole triangle (9 in this example). Also, like in the whole triangle, keep crocheting until there's only 1 sc left. From the top we'll do the same, we'll increase in alternate rounds, every other one, since you reach the half pb than in the whole triangle (9 in this case).

Para hacerlo empezando desde la base tejeremos la mitad de pb que en nuestro triángulo completo (en nuestro ejemplo serían 9). También al igual que con el triángulo, seguiremos tejiendo hasta que sólo nos quede un punto. Y desde la punta haremos lo mismo, aumentaremos una fila si una no hasta que lleguemos a la mitad de pb que en la base de nuestro triángulo (en nuestro ejemplo 9 pb).


Los triángulos dan mucho juego y son muy decorativos. Alterna triángulos de varios colores y conseguirás efectos preciosos. Anímate a tejerlos, que es muy fácil!

Triangles offer you a lot of possibilities, try combining different colors!

January 6, 2015

El Día de Reyes de Conchita y Kleine Louis

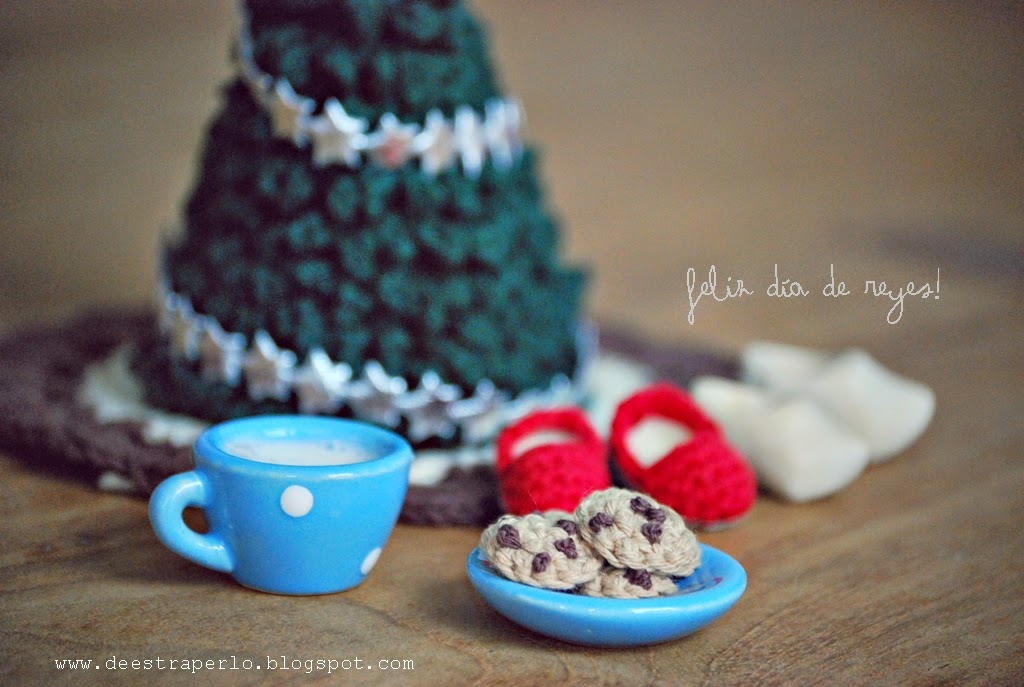
In Spain, Christmas Holidays aren't over until the Epiphany day (January the 6th), "La Noche de Reyes", when The Three Wise Men, (los Reyes Magos) bring presents to children  while they're sleeping...  Only if they've been good kids during the year, otherwise they'll bring you a piece of coal!

Todo el año esperando este día, verdad? A mi hace ya años que los reyes no me traen nada (soy taaaan mala que no me traen ni carbón), pero me sigue haciendo ilusión esta noche. Quién sabe... quizás este año vuelva a dejar mis zapatos bajo la ventana, a ver si hay suerte...


The night of the 5th of January is the most exciting night in the year. We use to leave our shoes under the Christmas Tree or close to the window and we also leave some cookies and milk for the Three Kings and their camels. Next morning we'd find the glasses empty, a lot of presents and... el Roscón de Reyes! El Roscón de Reyes is a ring-shaped cake that we eat on Epiphany day for breakfast. It contains inside a plastic or ceramic tiny toy, a dry bean or a coin. You'll also find a rolled paper crown in the ring. If you find the toy, the coin or the bean, you can wear the crown and you'll be the king of the day! This is how Kleine Louis and Conchita spent their Día de los Reyes Magos:


Conchita baked some cookies yesterday afternoon. They look delicious... "Hey Kleine Louis, stay away from this cookies! The're not for you! They're for Los Reyes Magos!"

Conchita pasó ayer toda la tarde horneando galletas para los reyes y sus camellos. Siempre he pensado que deben de acabar la noche hartos de tanta galleta y tanta leche! Quizás alguien debería arriesgarse y probar con un bocadillo de chorizo, a ver qué pasa.... Ahora que recuerdo en mi casa mi madre dejaba siempre una copa de cava en vez de un vaso de leche... me pregunto porqué sería....


Here they're, waiting sooo impatiently... they've served milk and cookies for the kings and their camels and left their shoes under the tree. Well done! Now go to sleep! They won't come if you're awake!


Cómo recuerdo esa tarde del día 5.... en la que a las 6 de la tarde ya te quieres meter en la cama para que pase cuanto antes la noche! Para luego no poder dormir de los nervios... Yo era de las que a las 7 de la mañana ya estaba despertando a toda la familia, no podía aguantar... Y por lo que veo, estos dos me han salido igual!


Madre mía, pero si han traído un roscón y todo! Qué bueno, es de nata, mi favorito! Pues con vuestro permiso... me voy a desayunar! 

FELIZ DÍA DE REYES A TODOS!

"Look!! The cups and the dishes are empty! They've eaten all the cookies!"  "Look Conchita, there's a Roscón de Reyes overthere! This is so exciting! And look, a lot of presents in our shoes!"


Who found the bean....? It had to be you Kleine Louis...


Kleine Louis and Conchita are designed and made by me. I made the tree following the Lazy Hobbyhopper pattern, for the cookies I used part of the Milky Robot pattern,  and el Roscón de Reyes is an adaptation of the original roscón pattern by great designer Kraft Croch

January 1, 2015

Happy new year!

HAPPY NEW YEAR!!
And how to crochet numbers...

Ha pasado un año desde que empecé el blog. Un año lleno de lanas, agujas, muñecos, puntos, fotografías, paseos por Amsterdam... así que además de felicitaros el año quiero aprovechar para agradeceros vuestro apoyo y vuestra compañía. Gracias por estar ahí! 


How to crochet numbers? You just need some cotton or yarn, pipe cleaners and your crochet hook. Crochet 6 single crochet in a magic ring. 
Crochet 6 increases (12 single crochets in total) 
Keep crocheting without increasing until tou have a tube long enough (better in spiral)
Insert the pipe cleaner into the tube 
Crochet 6 decreases
Now give the tube the shape that you want to form a number.


Quieres hacer tus propios números de ganchillo? Muy fácil! Necesitas algodón o lana, limpiapipas y tu aguja de ganchillo:
Teje 6 puntos bajos en anillo mágico. 
Teje 6 aumentos, uno por punto (12 puntos bajos en total)
Sigue tejiendo vueltas sin aumentar hasta que tengas un tubo lo suficientemete largo (te recomiendo que lo hagas en espiral)
Mete el limpiapipas dentro del tubo 
Teje 6 disminuciones y darle forma a tu número.


Releyendo el primer post que publiqué en el blog hace un año, he recordado que os hablé del proyecto que me ocupaba por aquel entonces, la chaqueta basada en el patrón Caramel de Isabel Kraemer. Pues bien, la terminé! Ahí va el resultado final. :)

Last year, in my first post, I told you about this project I was knitting, Caramel by Isabel Kraemer. Well, I finished it!


Related Posts Plugin for WordPress, Blogger...