July 31, 2015

Proyecto Colcha 2.0, "Maritime Code"

THE BLANKET PROJECT 
(Crochet along)

WEEK 10


What I have today for you is one of those squares that you love because they're easy and quick. I try to alternate the harder ones and the lighter ones, but anyway... at the end of the day we have to make them all! 

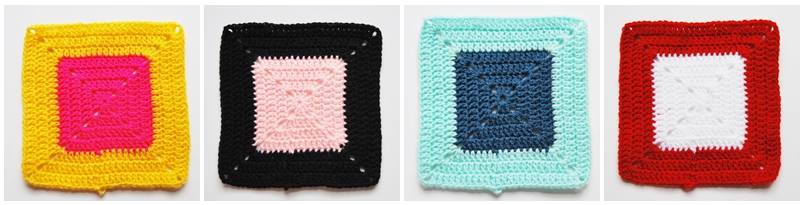
We're going to crochet a square in rounds. Wait, what? Yes, we're crocheting in rounds but creating 4 corners in order to create a square, like we do to crochet the traditional Granny square, or other squares we've seen here. I've named this square "Maritime Code" after the flags they use in the ships that represent the alphabet or some sort messages. They remind mi specifically to the ones they use that represent P and S.

Hoy os traigo una de estas aplicaciones que os gustan porque son fáciles y muy rápidas de hacer. Intento intercalar las más pesadas de realizar con las más ligeritas, pero vamos... que al final hay que hacerlas todas! 

Vamos a hacer un cuadrado pero trabajando en redondo, cómo es eso? Pues formando 4 esquinas, tal y como se hace en los tradicionales Granny Square y en algunas de las aplicaciones que ya hemos visto aquí. He llamado esta aplicación "Maritime Code" ya que me recuerda a las banderas que se usan en los barcos para representar las letras del alfabeto o transmitir mensajes. En concreto me recuerdan a las que se usan para las letras P (papa) y S (Sierra). 


1st round (rd): With blue and in a magic ring, chain 3 (count as a double crochet), 2 double crochet (dc), * ch 3, 3 dc, repeat from * twice, ch 3, join with slip stitch (sl st)
2nd rd: ch 3, dc in the next 2 stitches (st), corner ( in the next 3 ch space work 2 dc, ch 3, 2 dc in), * dc in the next 3 st, corner, repeat from * twice, join with a sl st.
3rd rd: ch 3, dc in the next 4 stitches (st), corner  * dc in the next 7 st, corner, repeat from * twice, dc in the next 2 st, join with a sl st.
4th rd: ch 3, dc in the next 6 stitches (st), corner  * dc in the next 11 st, corner, repeat from * twice, dc in the next 4 st, join with a sl st.

1ª vuelta (vta): Con azul y en círculo mágico, 3 cadenetas (equivalen a un punto alto), dos puntos altos (pa), *3 cadenetas (cad), 3 pa, repetir desde * 2 veces, 3 cad, unir con punto raso (pr)
2ª vta.: 3 cad, pa en los dos siguientes puntos,  esquina (en el siguiente espacio de 3 cad trabajar 2 pa, 3 cad, 2 pa), *pa en los siguientes 3 puntos, esquina, repetir desde * dos veces, cerrar con pr.
3ª vta.: 3 cad, pa en los 4 siguientes puntos, esquina, *pa en los siguientes 7 puntos, esquina, repetir desde * dos veces, pa en los siguientes 2 puntos, cerrar con pr.
4ª vta.: 3 cad, pa en los 6 siguientes puntos, esquina, *pa en los siguientes 11 puntos, esquina, repetir desde * dos veces, pa en los siguientes 4 puntos, cerrar con pr.


5th rdch 3, dc in the next 8 stitches (st), corner  * dc in the next 15 st, corner, repeat from * twice, dc in the next 6 st, join with a sl st.
6th rdch 3, dc in the next 10 stitches (st), corner  * dc in the next 19 st, corner, repeat from * twice, dc in the next 8 st, join with a sl st.
7th rdch 3, dc in the next 12 stitches (st), corner  * dc in the next 21 st, corner, repeat from * twice, dc in the next 10 st, join with a sl st.

Now make 3 more squares, one in neon pink and yellow, one in black and salmon and the last one in red and white.

5ª vta.: Con turquesa, 3 cad, pa en los 8 siguientes puntos, esquina, *pa en los siguientes 15 puntos, esquina, repetir desde * dos veces, pa en los siguientes 6 puntos, cerrar con pr.
6ª vta.: 3 cad, pa en los 10 siguientes puntos, esquina, *pa en los siguientes 19 puntos, esquina, repetir desde * dos veces, pa en los siguientes 8 puntos, cerrar con pr.
7ª vta.: 3 cad, pa en los 12 siguientes puntos, esquina, *pa en los siguientes 23 puntos, esquina, repetir desde * dos veces, pa en los siguientes 10 puntos, cerrar con pr.

Ahora teje otro en rosa fluorescente y amarillo, otro en salmón y negro y otro en blanco y rojo.


Remember using #proyectocolcha hashtag if your sharing your crochet squares on instagram!

Recuerda usar el hashtag #proyectocolcha si vas a compartir tus aplicaciones en instagram!

 
That's all folks! Another crochet square coming soon, you're gonna love it!
Crochet up and send me pictures!!!!

Pues esto ha sido todo por hoy. Dentro de poco una aplicación nueva que os va a encantar, ya veréis!
  Tejed mucho y enviadme fotos!!!!

Do you want to join our crochet along? Then do it!

Quieres participar en nuestro crochet along? Pues hazlo!

July 28, 2015

Cascais

Vacation, beach, family, relax, crochet, beach, swimmingpool, terraces, mosquitos, books, siesta, beach, flip flops, friends, nature, blue... is there something missing? Oh yes, the beach...

...for example, in Cascais

There's not much left to say about it... I guess all of you know what I'm talking about. You know what a beach vacation looks like. I don't think there's nothing better than that; when you only have to worry about wether to lie on the sand or on the sofa  and maybe at some point about  how hungry you are, or... man, it's so warm in here, I think I'm going into the water...

Vacaciones, playa, familia, descanso, ganchillo, playa, piscina, terrazas, mosquitos, libros, siestas, playa, chanclas, amigos, naturaleza, azul... se me olvida algo? Ah, si, la playa...

...por ejemplo, en Cascais

No me resta mucho más que decir al respecto... supongo que todos sabéis de lo que os hablo. Alguna vez lo habéis experimentado, verdad? No se si hay una sensación mejor a la de unas vacaciones en la playa. De esas en las que te tiras en cualquier sitio, en el sofá, en la arena, en la hierba... y no tienes que hacer nada más que eso, estar tirado. Y quizás en algún momento pensar en que tienes hambre o sed, y en "qué calor hace, me voy al agua"...


July 24, 2015

CAL, crochet your own "Pickles" with us

We've barely finished the Minus CAL and it was so much fun that we didn't wanted it to finish, so we're already organizing a new one to crochet Pickles! You asked for it and  your wishes are our command...

Acabamos de terminar el CAL para tejer a Minus y ya estamos empezando uno nuevo para tejer a Pickles!! Y es que lo pasamos tan bien que no queríamos que terminara... Vosotras nos lo habéis pedido y vuestros deseos son órdenes...

CAL para tejer a PICKLES
AGOSTO 2015


You already know about Pickles at this stage, Minus' friend who faithfully follows him in all his adventures. The girls that crocheted Minus realized that he was kind of bored, he needs his fellow traveller. Summer is better with a firend, isn't it? So here we are, Wasel Wasel and me, riding together again, organizing a new CAL in which we'll be crocheting Pickles together, with you.

A estas alturas ya conocéis a Pickles, el amigo de Minus que le sigue fielmente en todas sus aventuras. Las chicas que tejieron a Minus se dieron cuenta de que necesitaba un compañero, que el solo se estaba aburriendo un poquito... no es lo mismo pasar el verano con un amigo, verdad? Por lo que Wasel Wasel y yo nos hemos vuelto a liar la manta a la cabeza y aquí estamos de nuevo organizando un CAL, para pasar un mes de agosto tejiendo amigurumis juntas.


How?
Get the pattern, the cotton and share your experiences and doubts with us. We've created a Facebook group, follow the link and join the group. Use the hashtag #picklesandminus so we can have all the Pickles tracked.

Who?
Gemma from Wasel Wasel and I, have organized this party and we want YOU to join us.

What?
"Pickles" pattern
2,5mm Crochet hook
Stitch markers
Cotton: you can choose any yarn or thread that you want, our recommendation if you're using NATURA is ( Nacar N35, Passion N23, Jaunen Indian Yummy 89, Turquoise N49, Green Valley N14, Gris Argent N09, Sable N03, a bit of black for the nose.), other possibility is SHEEPJES (Lightgreen 642, Natural 501, Red 510, Dark Green 713, Grey 710, Turquoise 712, Light Grey 700, a bit of black for the nose)
Polyfill stuffing
2 9mm safety eyes
A piece of cardboard

Where?
Pattern: EtsyRavelry
Cotton: Deramores DMC
Kit DIY with all the materials you need to crochet your own PIckles: De Estraperlo shop on Etsy 

When? 
We'll start in August, but in the meanwhile you can join the group and start looking for the materials. The facebook group will be open for a month or 6 weeks.

Why? 
Because you love amigurumis, you'll learn a lot and we'll have a great time!


Cómo? 
Consigue tu patrón, consigue tus algodones, y comparte con nosotras tus experiencias, dudas y anécdotas. Hemos creado un grupo de Facebook especial para la ocasión, sigue el link, entra en el grupo y no te pierdas detalle! Usa el hashtag #picklesandminus para que todos los Pickles del mundo estén conectados!

Quién? 
Gemma de Wasel Wasel y yo nos hemos liado la manta a la cabeza y queremos que TÚ también te unas a nosotras.

Qué? 
Patrón de Pickles
Aguja de ganchillo de 2,5mm
Marcadores
Algodón: Puedes tejer a Minus en los colores que más te gusten, nuestra recomendación si usas NATURA es la siguiente: ( Nacar N35, Passion N23, Jaunen Indian Yummy 89, Turquoise N49, Green Valley N14, Gris Argent N09, Sable N03, un poco de negro para la nariz),otra alternativa es SHEEPJES (Lightgreen 642, Natural 501, Red 510, Dark Green 713, Grey 710, Turquoise 712, Light Grey 700, un poco de negro para la nariz)
Relleno sintético para muñecos
2 ojos de seguridad de 9mm
Trozo de cartón

Dónde?
Patrón: Etsy Ravelry
Algodones: Deramores DMC
Kit DIY con todos los materiales necesarios para tejer tu propio Pickles: Etsy (Si ya compraste el kit de Minus tendrás un descuento especial del 10% en el de Pickles!)

Cuándo? 
En agosto empezará la marcha, pero mientras tanto puedes ir haciendo acopio de los materiales. El grupo de facebook estará abierto entre un mes, mes y medio para que a todas nos de tiempo a terminar nuestro muñeco de ganchillo y disfrutar de él cuanto antes.

Porqué? 
Porque te encanta tejer amigurumis, aprenderás mucho y lo pasaremos bien!


Special discount for the "Pickles" DIY kit 

If you participated in our Minus CAL, you'll have a 10% off in Pickles kit during the mont of August. Just tell me you want to buy it and I'll send you the coupon code! Oh yeah!

Descuento especial en el DIY kit de "Pickles"

Aquellos que ya participasteis en el CAL de Minus podréis disfrutar de un 10% de descuento en el kit de Pickles durante el mes de Agosto. Sólo tienes que decírmelo y te mandaré el cupón de descuento! Si!

(El descuento es sólo aplicable al kit y sólo mientras dure el CAL)


Remember using the hashtag #picklesandminus on instagram, twitter...

Recuerda usar el hashtag #picklesandminus en instagram, twitter... para no perdernos detalle de vuestros avances y poder contestar todas vuestras dudas!

July 21, 2015

How to avoid the "corner effect"

This week's tip is very useful and you're going to love it. Have you noticed those angles that use to appear  when crocheting a flat circle, with the proportional increase, transforming your circle into a polygon? Depending on the project, you may even like this effect, but what if you really wanted a circle? A proper, round circle?

El truco de esta semana es super útil y os va a encantar. Verdad que cuando tejéis en círculos, siguiendo el sistema de aumento proporcional, se os van formando fila a fila, unos ángulos que van poco a poco convirtiendo vuestro círculo en un polígono? Dependiendo del proyecto puede que hasta nos guste este efecto, pero y si no nos gusta? Y si lo que queremos es un auténtico círculo, sin ángulos?

CÓMO EVITAR EL "EFECTO ESQUINA"


The "corner effect" appears when we increase in the stitch that we've increased in the previous round, over and over again. This stitch becomes an angle in the end. So, if we want to avoid this, we have to change the order a bit and separate the increases. Of course you can do it ramdonly, but I preffer to use this scheme, so I won't never get lost.

First we'll see the traditional proportional increase (in a 6 single crochet circle):

1st round (rd): 6 single crochet (sc) in magic loop.
2nd rd.: 6 increases (inc) (12 sc in total)
3rd rd.: [1 sc, 1 inc] 6 times (x6) (18 sc)
4th rd.: [2 sc, 1 inc] x6 (24 sc)
5th rd.: [3 sc, 1 inc] x6 (30 sc)
6th rd.
[4 sc, 1 inc] x6 (36 sc)
7th rd.: [5 sc, 1 inc] x6 (42 sc)
8th rd.
[6 sc, 1 inc] x6 (48 sc)
9th rd.: [7 sc, 1 inc] x6 (54 sc)
10th rd.: 
[8 sc, 1 inc] x6 (60 sc)
And so on...

As you see, we're adding a new sc between increases in each round. Following this scheme WE'LL HAVE THE "CORNER EFFECT".

El "efecto esquina" se debe ni más ni menos a que según el aumento proporcional, los aumentos siempre coinciden en el mismo lugar, por lo que ese punto se va acentuando y transformándose en un ángulo. Para evitarlo no tenemos más que cambiar el orden para que no coincidan siempre. Puedes hacerlo aleatoriamente, pero yo te voy a enseñar el sistema que suelo usar , cambiando el orden en cada fila par.

Primero veremos el tradicional aumento proporcional (en esta caso vamos a trabajar con un círculo de 6 puntos bajos:

1ª vuelta (vta): 6 puntos bajos (pb) en un anillo mágico
2ª vta.: 6 aumentos (aum) (12 pb en total)
3ª vta.: [1 pb, 1 aum] 6 veces (x 6) (18pb)
4ª vta.: [2 pb, 1 aum] x 6 (24 pb)
5ª vta.: [3 pb, 1 aum] x 6 (30 pb)
6ª vta.: [4 pb, 1 aum] x 6 (36 pb)
7ª vta.: [5 pb, 1 aum] x 6 (42 pb)
8ª vta.: [6 pb, 1 aum] x 6 (48 pb)
9ª vta.: [7 pb, 1 aum] x 6 (54 pb)
10ª vta.: [8 pb, 1 aum] x 6 (60 pb)
Y así sucesivamente...

Como veis, en cada vuelta añadimos un punto bajo más entre aumento y aumento, pero todos los aumentos coinciden en el mismo lugar. Con este sistema TENDREMOS EFECTO ESQUINA. Según el material, aguja, tensión, etc... puede ser mayor o menor, aparecer antes o después, pero aparecerá.


Let's see now what to do to avoid it. To do so, we're spliting the first group of single crochets in two, first half at the beginning, other half at the end of the row, only in even rounds. The rest of the round remains the same. Now WE'LL AVOID THE "CORNER EFFECT" 

1st round (rd): 6 single crochet (sc) in magic loop.
2nd rd.: 6 increases (inc) (12 sc in total)
3rd rd.: [1 sc, 1 inc] 6 times (x6) (18 sc)
4th rd.: 1 sc, 1 inc, [2 sc, 1 inc] x5 , 1 sc (24 sc)
5th rd .: [3 sc, 1 inc] x6 (30 sc)
6th rd .:
 2 sc, 1 inc, [4 sc, 1 inc] x5 , 2 sc (36 sc)
7th rd.: [5 sc, 1 inc] x6 (42 sc)
8th rd.
 3 sc, 1 inc, [6 sc, 1 inc] x5 , 3 sc (48 sc)
9th rd.: [7 sc, 1 inc] x6 (54 sc)
10th rd.: 
 4 sc, 1 inc, [8 sc, 1 inc] x5 , 4 sc (60 sc)
And so on...

Veamos ahora cómo hacer para evitarlo. Para ello, en las vueltas pares, dividiremos el primer bloque de puntos bajos en dos, haciendo una parte al principio de la vuelta y otra parte al final de la vuelta. El resto seguirá igual. Con este sistema EVITAREMOS EL EFECTO ESQUINA:

1ª vuelta (vta): 6 puntos bajos (pb) en un anillo mágico
2ª vta.: 6 aumentos (aum) (12 pb en total)
3ª vta.: [1 pb, 1 aum] 6 veces (x 6) (18pb)
4ª vta.: 1pb, 1 aum, [2 pb, 1 aum] x 5, 1 pb (24 pb)
5ª vta.: [3 pb, 1 aum] x 6 (30 pb)
6ª vta.: 2 pb, 1 aum, [4 pb, 1 aum] x 5, 2 pb (36 pb)
7ª vta.: [5 pb, 1 aum] x 6 (42 pb)
8ª vta.: 3pb, 1 aum, [6 pb, 1 aum] x 5, 3 pb (48 pb)
9ª vta.: [7 pb, 1 aum] x 6 (54 pb)
10ª vta.: 4pb, 1 aum, [8 pb, 1 aum] x 5, 4 pb (60 pb)
Y así sucesivamente.


Share this post if you found it helpful! Thank you :) 
More crochet tips here.

Comparte este post si lo has encontrado útil! Gracias :) 
Más trucos de ganchillo aquí.

July 17, 2015

Proyecto Colcha 2.0, "Arriquitaun" Square

THE BLANKET PROJECT
(Crochet along)

WEEK 9


I'm so thrilled! I've already started joining my crochet squares and I can see clearly how the blanket is going to look when finished and... I love it! It's becoming almost as I imagined it. We're almost there my dear friends, 5 more squares, joining them, a cute edge and... c'est fini!
Today's crochet square is one of the most succesfull in my lessons. My students always ask me for  "the one with the colored little balls, the one with the colored little balls!!!" Actually it's very nice but, watch out, as every single crochet square, it takes its time. I've named it "Arriquitaun" (wich is a word used in Andalusia to express cheerful mode) because it reminds me a flamenco dancer suit.

Estoy muy emocionada. Ya he empezado a unir mis aplicaciones y ya puedo ver claramente cómo va a quedar la manta y... me encanta! Está quedando tal y como la había imaginado en mis bocetos. Ya nos queda muy poco amigos, 5 aplicaciones más, unirlas, un bordecito mono, y c'est fini! 
La aplicación que vamos a ver hoy es una de las que más éxito tienen. Mis alumnas siempre me piden "la de las bolitas de colores, la de las bolitas de colores!!!" La verdad es que es muy bonita, pero ojo, como toda aplicación de punto bajo es entretenida y lleva su tiempo. La he llamado Arriquitaun porque la veo muy flamenca, a que si?


Foundation row: With turquoise, chain (ch) 29 
1st and 2nd row: 28 single crochet (sc), ch 1 (remember that when we are working in single corchet rows, we have to ch 1 before starting a new row)
3rd row: 3 sc, with red *bubble in next sc, with turquoise 5 sc, repeat from * twice, with red bubble in next sc, with turquoise 6 sc.
4th to 6th row: 28 sc, ch 1
7th row: 6 sc, with red *bubble in next sc, with turquoise 5 sc, repeat from * twice, with red bubble in next sc, with turquoise 3 sc.
8th to 10th rows: 28 sc, ch 1

Cadeneta base: Con turquesa, 29 cadenetas (cad)
1ª y 2ª filas: 28 puntos bajos (pb), una cad (recuerda que cuando trabajamos en filas de punto bajo debemos tejer un punto de cadeneta siempre antes de empezar una nueva fila.)
3ª fila: 3 pb, con rojo *piña en el pb siguiente, con turquesa 5 pb, repetir desde * 2 veces, con rojo piña en el pb siguiente, con turquesa 6 pb.
4ª a 6ª filas: 28 pb, 1 cad
7ª fila: 6 pb, con rojo,*piña en el pb siguiente, con turquesa 5 pb, repetir desde * 2 veces, con rojo piña en el pb siguiente, con turquesa 3 pb.
8ª a 10ª filas: 28 pb, 1 cad


Repeat from 3rd row till you have a square. Try to finish with any of the sc rows instead of one of the bubble stitch rows. It took me 9 bubble stitch rows , and I finished with 2 sc rows.

A partir de aquí repetir desde la fila 3 hasta conseguir un cuadrado. Intenta terminar con alguna de las filas de pb mejor que con una de piñas. En mi caso he llegado a las 9 filas de piñas y he finalizado con dos filas de pb.

I can see now that you're getting nervous because you don't know ...

Tranqui, que ya veo que te estás poniendo nerviosa porque no sabes...

HOW TO CROCHET THE BUBBLE STITCH / CÓMO TEJER PIÑAS 


We'll start our bubble with a yarn over (yo) like in a double crochet (dc). We're crocheting a bubble in a different colour from the base colour (turquoise), so *yo with the new colour (red), insert the hook in next stitch (st), pull up a loop. Now you have 3 loops on the hook, one turquoise and two red (see first picture), yo and pull through the 2 red loops. Repeat from * 4 more times until you have 6 loops on your hook, 1 turquoise and 5 red (see 2nd picture). Yo and pull through the 6 of them (3rd picture). Now change to turquoise, chain 1 and keep following the pattern. Don't cut the red thread, keep crocheting your sc in turquoise but carrying the red inside the stitches, like in the tapestry crochet (Picture 4).

Empezamos nuestra piña cogiendo hebra como si fuésemos a realizar un punto alto (pa). En este caso, al tratarse de una piña de un color distinto al color base (turquesa), *cogemos la hebra del color nuevo (rojo). Insertamos el gancho en el punto especificado. Cogemos hebra y sacamos la aguja. Ahora tenemos 3 lazadas en el gancho, una turquesa y dos rojas (ver la primera imagen). Cogemos hebra de nuevo y la sacamos por las dos primeras lazadas, las rojas. Repetimos desde * 4 veces más hasta que tengamos 6 lazadas en el gancho, 1 turquesa y 5 rojas. Cogemos hebra y la sacamos por las 6 lazadas de golpe (ver tercera foto). Ahora hacemos una cadeneta con el turquesa y seguimos avanzando normalmente con el patrón. No cortes el hilo rojo, sigue tejiendo tus puntos bajos en turquesa, pero envolviendo el hilo rojo, como en el tapestry crochet (ver cuarta foto).


Be careful with  the row following to the bubbles one because you've kind of added a new stitch after each bubble by the "ch 1 " step, so in order to avoid that, work just one of the 2 stitches you'll find on top of the bubble. As you can see in the picture, skip the red and work the turquoise. And always count the stitches!

Now work 3 more squares, one in black and white, one in red and white and one in blue and salmon.

Ten cuidado con la vuelta siguiente a una vuelta con piñas, ya que al hacer una cadeneta cada vez que cerramos una piña puedes confundirte y añadir puntos de más. Para que esto no pase, trabaja sólo uno de los dos puntos que caen sobre la piña. Como ves en la imagen, salta el rojo y trabaja el turquesa. Y cuenta siempre los puntos!

Ahora haz 3 aplicaciones más, una en blanco y negro, otra en rojo y blanco y otra en azul y salmón.


Remember using #proyectocolcha hashtag if your sharing your crochet squares on instagram!

Recuerda usar el hashtag #proyectocolcha si vas a compartir tus aplicaciones en instagram!


That's all folks! Another crochet square coming soon, you're gonna love it!
Crochet up and send me pictures!!!!

Pues esto ha sido todo por hoy. Dentro de poco una aplicación nueva que os va a encantar, ya veréis!
  Tejed mucho y enviadme fotos!!!!

Do you want to join our crochet along? Then do it!

Quieres participar en nuestro crochet along? Pues hazlo!


July 14, 2015

A Quinta da Regaleira, mystery and enigmas

You know that every now and then I use to write about places that I've visited and I like. They're normally in Amsterdam or surroundings, but since it is summer and it's time to travel and go on vacation, let's take a trip ourselves, to Portugal, much more summery than Amsterdam. I've already told you about my visit to Lisbon and to Retrosaria, and now it's Sintra's turn, in fact one of the most crazy and eccentric places I've ever been: A Quinta da Regaleira.

Sabéis que de vez en cuando me gusta hablaros de los lugares que visito y me gustan. Normalmente es sobre Amsterdam u Holanda en general, pero como es verano y es época de vacaciones y viajes, aprovechamos para viajar un poco nosotros también y nos vamos a Portugal, que es mucho más veraniego. Ya os hablé un poco sobre mi visita a Lisboa y a Retrosaria, y ahora le toca el turno a Sintra, en concreto al lugar más loco y excéntrico que he visitado nunca: A Quinta da Regaleira.


The palace, built in the early 20th century, is amazing, but at the end of the day is just another amazing palace... You'll find  the real suprise in the garden. The huge, mysterious and even creepy garden.

El palacio,  construido a principios del siglo pasado, es asombroso, pero no deja de ser un palacio asombroso como otros tantos que veréis en vuestra vida. Lo realmente sorprendente lo encontraréis en los jardines. Jardines inmensos, misteriosos e incluso escalofriantes.


It's a whimsical place, full of enigma and masonic, templar and cosmic symbols, in which nothing is there by random. Everything is perfectly studied and planned by a couple of brains filled with fantasy and magics and, why not... a little bit twisted and sinister, I would say...

Es un lugar caprichoso lleno de enigmas y símbolos masónicos, templarios y cósmicos, en el cual nada está ahí por azar, todo está milimétricamente estudiado y planeado, por un par de cerebros llenos de fantasía, magia y, nos nos engañemos... algo retorcidos y siniestros...


There are tunnels, grottos and underground caves all over the garden, connecting strategic spots. Some of them are illuminated but most of them aren't so you have to use a lantern or your mobile phone. It's a huge system of tunnels with spiral staircases dug in the stone walls that go up and down connecting the centre of the Earth with the sky.

Los túneles, grutas y lagos subterráneos recorren todo el jardín por debajo, conectando puntos estratégicos. Alguno está iluminado, pero la mayoría no, por lo que necesitaréis una linterna o el móvil. De todos ellos salen otros túneles, escaleras de caracol talladas en la piedra que suben y bajan conectando el centro de la tierra con el cielo.


And suddenly you find places like the Initiation Well, where they use to perform masonic initiation rituals. I'm not going to write here all the story behind this amazing place because you have wikipedia to find about it, but I recommend you to read a bit more about António Augusto Carvalho Montero, the owner, and Luigi Manini, the architect.

Y de repente llegas a lugares como el Pozo Iniciático, donde se realizaban rituales masónicos de iniciación. No os voy a contar aquí todos los detalles de la historia de este sitio loco, porque para eso ya está la wikipedia, pero os recomiendo que en algún momento le echéis un vistazo y conozcáis un poco más sobre António Augusto Carvalho Montero, propietario e impulsor del proyecto, y Luigi Manini, arquitecto que lo llevó a cabo.


It is really fun and creepy at the same time. It's the closest I've ever been to a "Goonie style adventure". Lost inside the grottos with lanterns, the water drops echoing when falling down from the stalactites, not knowing where you're going to end.... The fact of bumping into another tourist when you're drilled in your adventurer ecstasy is kinf of a mood killer, but if your imagination level is high enough you can easily deal with this. And to be honest, I wouldn't like to be there alone, not for just a minute...

De verdad que es todo muy divertido y creepy a la vez. Es lo más cerca que me he sentido nunca de vivir una aventura tipo Goonies. Perdidos por las grutas con linternas, escuchando el eco de las gotas de agua caer de las estalactitas, sin saber dónde vas a ir a parar... El cruzarte con otro turista cuando estas en pleno éxtasis aventurero te corta un poco el rollo, pero bueno, si tienes un buen nivel de imaginación disfrutarás igual. Y, sinceramente, tampoco me gustaría encontrarme sola en este sitio...


So you know, if you're the enigma and unsolved mystery kind, don't miss this place. And as a dessert, enjoy these videos that will make you feel the same way that you feel when you're there: "What the hell is this?!?!"

Así que ya sabéis, si lo vuestro son los enigmas y los misterios sin resolver, no dejéis de visitar este lugar. Como postre os dejo estos vídeos que os dejarán con la misma sensación que tienes cuando estás aquí: "Pero ésto qué es?!!?"


July 10, 2015

Crocheting with natural fibres

I know that it's not easy to crochet with yarn in this heat... that's why I like this season to try new fibers and materials instead. Of course that we'll always have our loyal and dear cotton by our side, but I'm talking about taking one step further: buying your materials at the hardware store. Today I'd like to try with jute, so I've chosen this box, very easy to make and perfect to hide our secrets inside (or all this useless stuff that we use to stock and we never know where to store...).

Se que con este calor nos cuesta muchísimo tocar la lana, por eso aprovecho esta época para tejer con otro tipo de fibras y probar materiales nuevos. Por supuesto que tenemos a nuestro fiel y querido algodón siempre a nuestro lado preparado para dar lo mejor de si mismo, pero hablo de dar un paso más allá: ir a comprar materiales a la ferretería en vez de a nuestra tienda de lana. Esta vez vamos a probar con yute, y he elegido esta caja, super sencilla e ideal para guardar nuestros secretos (o todas esas cosas inútiles que acumulamos y nunca sabemos dónde guardar...).

HOW TO CROCHET A BOX WITH JUTE
CÓMO TEJER UNA CAJA CON YUTE


These are the materials we're going to use:

  • Less than 100m of jute (I can't tell the exact amount, it depends... I used less than 2 skeins of 35m each, from TIGER)
  • 3mm/C-D/11 crochet hoock (The size depends on how thick the yute is. Try to use the one you'll use for a yarn as thick as your yute, as we don't want to make big holes, we want a tight weave)
  • Stitch marker
  • Tapestry needle
  • Scissors
A piece of advice: crocheting with jute and other kind of ropes and rustic strings is not the same as crocheting with your soft and sweet cottons and yarns... IT HURTS. It's hard and your fingers, specially your thumb, will suffer the consequences. So choose your most ergonomic hook and crochet off an on. Make some finger stretchings and massage your thumb a bit. But do not panic and give it a try!


Los materiales que necesitaremos:

  • Menos de 100m, de yute (No te puedo decir la cantidad exacta porque depende... yo usé menos de 2 rollos de 35m, de TIGER)
  • Aguja de ganchillo de 3mm (El tamaño de la aguja dependerá del grosor del material que uses. Para elegir aguja ten en cuenta que no nos interesa que queden agujeros. Usa la aguja que usarías para una lana de ese grosor.)
  • Marcador
  • Aguja lanera
  • Tijeras
Un consejo: tejer con yute y otros tipos de cuerdas y materiales rústicos no es lo mismo que tejer con tus suaves y dulces algodones y lanas.... DUELE. Está duro y los dedos, especialmente el pulgar, se resienten bastante. Así que te recomiendo que escojas tu aguja más ergonómica y que lo vayas haciendo a ratitos. Y luego unos  buenos estiramientos y masajes en el pulgar. Pero merece la pena, el resultado es precioso.


The box has 3 parts: the basket, the top and the handle. We'll start with the basket. In order to crochet the basket we'll make a proportional flat circle, with the technique we've learnt and practiced a lot of times with my tutorials:

1st round (rd): 6 single crochet (sc) in magic loop.
2nd rd.: 6 increases (inc) (12 sc in total)
3rd rd.: [1 inc, 1 sc] 6 times (x6) (18 sc)
4th rd.: [1 inc, 2 sc] x6 (24 sc)
5th rd .: [1 inc, 3 sc] x6 (30 sc)
6th rd .: 2 sc, 1 inc, [4 sc, 1 inc] x5, 2 sc (36 sc)
7th rd.: [1 inc, 5 sc] x6 (42 sc)
8th rd.: 3 sc, 1 inc, [6 sc, 1 inc] x5, 3 sc (48 sc)
9th rd.: [1 inc, 7 sc] x6 (54 sc)
10th rd.: 4 sc, 1 inc, [8 sc, 1 inc] x5, 4 sc (60 sc)
11th rd.: [1 inc, 9 sc] x6 (66 sc)
12th rd.: 66 sc in back loop (bl)
13th to 30th rd.: 66 sc
Cut the yute and fasten off. 

La caja consta de 3 piezas: El cesto, la tapa y el asa. Empezaremos con el cesto. Para tejer la base del cesto haremos un círculo proporcional plano, con la técnica que ya hemos aprendido y practicado muchas veces en mis tutoriales:

1ª vuelta (vta): 6 puntos bajos (pb) en anillo mágico.
2ª vta.: 6 aumentos (aum) (12 pb)
3ª vta.: [1 aum, 1 pb] 6 veces (x6) (18 pb)
4ª vta.: [1 aum, 2 pb] x6 (24 pb)
5ª vta.: [1 aum, 3 pb] x6 (30 pb)
6ª vta.: 2 pb, 1 aum, [4 pb, 1 aum] x5, 2 pb (36 pb)
7ª vta.: [1 aum, 5 pb] x6 (42 pb)
8ª vta.: 3 pb, 1 aum, [6 pb, 1 aum] x5, 3 pb (48 pb)
9ª vta.: [1 aum, 7 pb] x6 (54 pb)
10ª vta.: 4 pb, 1 aum, [8 pb, 1 aum] x5, 4 pb (60 pb)
11ª vta.: [1 aum, 9 pb] x6 (66 pb)
12ª vta.: 66 pb en back loop (bl)
13ª a 30ª vta.: 66 pb
Corta el hilo y remata.


Second piece will be the top. It's like the basket but a bit bigger and much shorter. First rounds are exactly like the basket:

1st rd to 11th rd.: like the basket.
12th rd.: 5 pb, 1 aum, [10 pb, 1 aum] x5, 5 pb (66 pb)
13th rd.: 72 sc
14th rd.: 72 sc in bl
15th to 18th rd.: 72 sc
Cut the yute and fasten off.

La segunda pieza de la caja será la tapa. Es igual que el cesto, pero un poco más grande y mucho menos alta. Empezamos igual que el cesto:

1ª a 11ª vta.: Tejer igual que en el cesto
12ª vta.: 5 pb, 1 aum, [10 pb, 1 aum] x5, 5 pb (72 pb)
13ª vta.: 72 pb
14ª vta.: 72 pb en bl
15ª a 18ª vta.: 72 pb
Corta el hilo y remata.


And last but not least... the handle. Leave a long tail at the beginning and at the end, to attacht it to the cover later.

1st rd.: Chain (ch) 16
2nd and 3rd rd.: 15 sc

Attach the handle to the top by sewing with the tapestry needle.

Y por último el asa. Deja una hebra larga al empezar las cadenetas y otra al terminar la 3ª vta., para poder coser más tarde el asa a la tapa.

1ª vta.: 16 cadenetas (cad)
2ª  y 3ª vta.: 15 pb

Cose el asa a la tapa usando la aguja lanera.


If you're fond of rustic style, like me, you should try different materials, from natural fibers to synthetic ones. There's no limit, just try and see what happens. You can also try different sizes, make it taller, or smaller... you can also mix other colour materials or even use 2 different threads at the same time, one of jute and another one of cotton for example... So, you know, use all these tips and you'll be ready to redecorate your home!

Si os gusta el estilo rústico, como a mi, probad distintos materiales, desde fibras naturales hasta sintéticas. No hay límite, tú prueba y a ver qué sale. También podéis probar distintos tamaños, más alta, más pequeña... Otra idea es mezclar con otros materiales de otros colores o incluso utilizar dos hebras distintas a la vez, una de yute y otra de algodón, por ejemplo... Pues ya sabes, pon en práctica todas estas ideas, y a redecorar tu casa!


If you like this tutorial share it with your crafty friends! 
(Find more tutorials here.)

Si te ha gustado este tutorial compártelo con tus amigas!
(Más tutoriales aquí.)

More tutorials using the proportional increasing / Otros tutoriales usando el aumento proporcional:

July 7, 2015

Retrosaria, Lisbon

I first knew about Rosa Pomar back in 2007 when on a trip I found the book Plush-O-Rama, Curious Creatures for Immature Adults, by Linda Kopp. It has a couple of pages dedicated to Rosa and her dolls. Her work was one of my references during the time I spent making softies. Years later I knew about this web Retrosaria and its online shop, blog... but it was a couple of weeks ago, when I went to the shop in Lisbon  and there I saw the dolls, when I realized that it was the same person behind the two projects. So Rosa is someone that I happen to admire twice in my life for different reasons without knowing that it was the same person. I'm sure it'll be a new reason for it to happen a third time...

Descubrí a Rosa Pomar allá por el 2007 cuando en un viaje encontré en una librería el libro Plush-O-Rama, Curious Creatures for Immature Adults, de Linda Kopp. En él dedican un par de páginas a Rosa y sus muñecos. Su trabajo fue una de mis referencias durante el tiempo que me dediqué a hacer muñecos de trapo. Años después conocí la web de Retrosaria y la tienda online, blog, etc... pero no fue hasta el otro día cuando estuve ahí in situ y vi un par de muñecos dentro la tienda que lo relacioné todo y me di cuenta de que se trataba de la misma persona. Así pues Rosa es alguien a quien he acabado admirando dos veces en mi vida por motivos distintos, sin saber que era la misma persona. Seguro que algún motivo más me dará para que suceda una tercera vez...


Those who know about Rosa and her career probably know already about her book "Malhas Portuguesas". The book is wonderful so I had to buy it... As soon as I finish reading it I'll tell you a bit about it.

Los que conocéis a Rosa y seguís su trayectoria seguro que conocéis ya su libro "Malhas Portuguesas". Es una auténtica maravilla, por lo que, claro, tuve que comprarlo... En cuanto lo termine de leer os hablaré un poco de él.


If you go to Lisbon and you're a yarn and needle addict don't miss this shop. It's a gift for the senses. It's located in Rua do Loreto 61, 2nd floor.

Si vais a Lisboa y sois adictos a las lanas y agujas no podéis dejar de visitar esta tienda. Es un regalo para los sentidos. Está en la Rua do Loreto 61, en el 2º piso. 

July 3, 2015

Proyecto Colcha 2.0, so far so good


Well, yeah my friends... as unbeliavable as it sounds, it's been 4 months since we started our Blanket Project. For months in which we've seen 8 different granny square designs and we've crocheted 38 squares so far. I'm sure you never thought you would be able to make it. If you've resisted till here you can state clearly that you're having a new blanket next winter, because... there's no way back baby...

Pues si amigos, por increíble que os parezca ya llevamos 4 meses con nuestro Proyecto Colcha. Cuatro meses en los que hemos visto ya 8 diseños distintos de granny square y hemos tejido en total 38 aplicaciones. Creíais que no ibais a llegar hasta aquí? Pues si habéis llegado hasta aquí ya podéis afirmar que vais a tener una colcha el próximo invierno, porque ya no hay marcha atrás baby...

These are all the deisgns we've seen:

Vamos a hacer un repaso a las aplicaciones que hemos visto hasta ahora:


SLOWLY BUT SURELY
SIN PRISA PERO SIN PAUSA 

If you're new in the project, it would be better that you had a look on this link before. You can start your project whenever you want, there're no dead lines here. But, just a piece of advice, once you've started don't quit, be constant, it will certainly be worth and you'll feel very proud of yourself with your new crochet blanket over your lap.

Si eres nuevo en el proyecto, te aconsejo que le eches un vistazo a este enlace primero y leas bien en qué consiste. Puedes empezar el proyecto cuando quieras, no hay fecha de inicio ni de final. Eso si, un consejo, una vez empieces mantente constante, merecerá la pena el esfuerzo y te sentirás super orgullosa cuando tengas tu manta sobre las piernas.


NEWBIES ALLOWED
SE ACEPTAN NOVATOS

Don't worry if you're a total newbie in the crochet world, you can also make your blanket. You can begin with the easy ones and slowly increase the difficulty level. You'll find plenty of tutorials on my posts, so go ahead and give it a try! This is the best sequence in case you're a new crocheter:

Si eres un novato total  no te preocupes, también puedes hacer tu manta. Puedes empezar por las aplicaciones más fáciles y poco a poco irás cogiendo la destreza necesaria para el resto. Yo suelo acompañar cada tutorial con explicaciones de técnicas y puntos básicos, así que anímate y prueba!
En este caso te recomiendo el siguiente orden, según el nivel de dificultad:

  • "Rugby League" Square
  • "Persian Blinds" Square
  • "Tire Footprint" Square
  • "Puffed Rice" Square
  • "Pico Esquina" Square
  • "Meeting Point" Square
  • "Bubble Wrap" Square
  • "Dutch Spring" Square


Remember using #proyectocolcha hashtag if your sharing your crochet squares on instagram!

Recuerda usar el hashtag #proyectocolcha si vas a compartir tus aplicaciones en instagram!

 
That's all folks! Another crochet square coming soon, you're gonna love it!
Crochet up and send me pictures!!!!

Pues esto ha sido todo por hoy. Dentro de poco una aplicación nueva que os va a encantar, ya veréis!
  Tejed mucho y enviadme fotos!!!!

Do you want to join our crochet along? Then do it!

Quieres participar en nuestro crochet along? Pues hazlo!
Related Posts Plugin for WordPress, Blogger...