
The Netherlands in spring are just amazing. You can't walk one step without running into thousands of flowers, and tulips are literally at every corner. If you haven't been here yet, I recommend you this time of the year. It's not that cold, you can see the sun shyly shinning and the flowers' show won't leave you indifferent.
Lo de Holanda en primavera es simplemente espectacular. No das un paso sin ver una flor y los tulipanes están literalmente en todas las esquinas. Si no habéis venido nunca, os recomiendo que lo hagáis en esta época, ya que el sol empieza a dejarse ver, y el espectáculo de las flores no os dejará indiferentes.


Every morning, you leave the house, with your thoughts, but little by little all this flowers get into your head, throw out your thoughts and stay there, just making you a little happier. That's why I would like to share with you this joy that Amsterdam tulips can transmit.
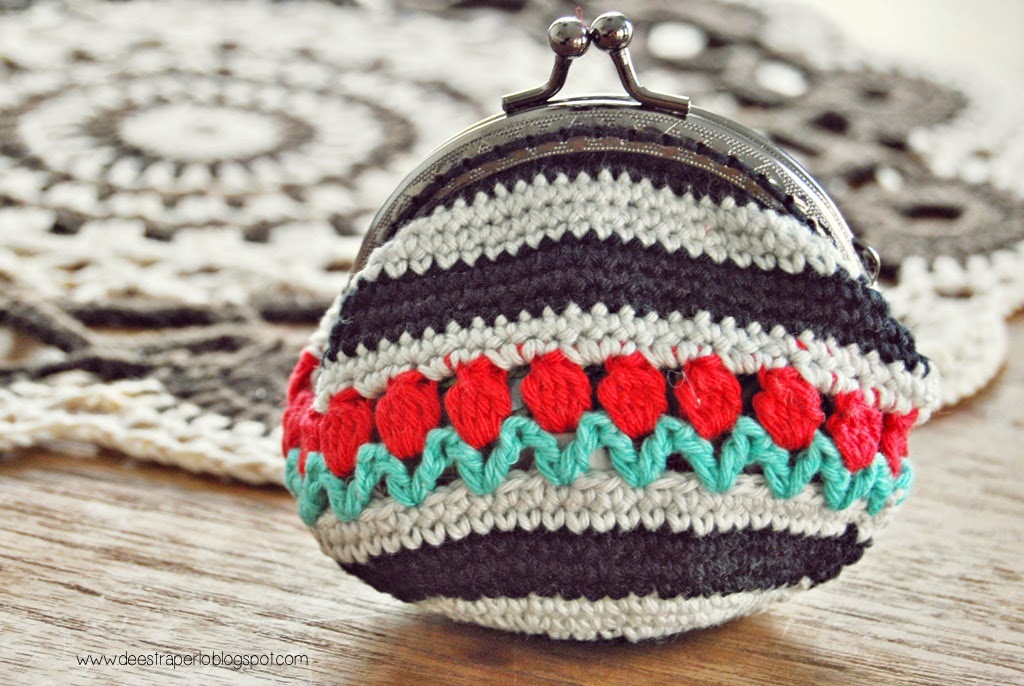
How to crochet a coin purse and how to crochet the tulip stitch
Cada mañana sales de casa, pensando en tus cosas, pero poco a poco, las flores desparramadas por toda la ciudad se te meten en la cabeza, sacan esos pensamientos y ahí se quedan, haciéndote un poco más feliz. Por eso quiero compartir con vosotros esa alegría que transmiten los tulipanes de Amsterdam.
Cómo hacer un monedero de boquilla de ganchillo y cómo tejer el punto de tulipán

You will need:
- 2,5 mm (B/ 00) crochet hook
- White, black, red and green cotton
- 8 cm (3,15") coin purse frame
-Stitch marker, tapestry needle, scissors
Materiales necesarios:
-Aguja de ganchillo de 2,5 mm
-Algodón en blanco, negro, verde y rojo
-Boquilla para monedero de 8 cm
-Marcador, aguja lanera y tijeras

Let's start with the base:
Start crocheting a flat circle using the proportional increase technique since you reach the size of the frame open. The number of rounds will depend of the size of your frame, the thread and hook your using and your gauge. IMPORTANT: For the Tulip Stitch, the number of stitches in the last round of the base must be a multiple of 3. If it's not, you should increase 1 or 2 stitches in the last row in order to get the amount you need. (If your first round has 6 stitches, as in the example, you shouldn't have any problem)
Empezamos con la base:
Empezamos tejiendo un círculo plano usando la técnica del aumento proporcional, hasta alcanzar el tamaño de la boquilla abierta. El número de vueltas y puntos dependerá del tamaño de vuestra boquilla, del hilo y aguja que estés usando y de vuestra tensión. IMPORTANTE: Para el Punto Tulipán, el número final de puntos debe ser múltiplo de tres. Si tu círculo final no cumple esta características, haz uno o dos aumentos en la última fila hasta conseguir un número de puntos múltiplo de 3. (Si la primera vuelta la haces de 6 puntos bajos, como yo en este ejemplo, no debes tener problemas para que el número final sea múltiplo de 3.)

Joining rounds and changing colour every 3 rounds:
1st round (rd) With white, 6 single crochet stitches (sc) in a magic loop.
2nd rd: 6 increases (inc) (Total: 12 sc )
3rd rd.: [1 inc, 1 sc] 6 times (x6) (18 sc)
4th rd: Change to black, [1 inc, 2 sc] x6 (24 sc)
5th rd.: [1 inc, 3 sc] x6 (30 sc)
6th rd: 2 sc, 1 inc, [4 sc, 1 inc] x5, 2 sc (36 sc)
7th rd: Change to white, [1 inc, 5 sc] x6 (42 sc)
8th rd: 3 sc, 1 inc, [6 sc, 1 inc] x5, 3 sc (48 sc)
9th rd: [1 inc, 7 sc] x6 (54 sc)
10th rd: Change to black, 4 sc, 1 inc, [8 sc, 1 inc] x5, 4 sc (60 sc)
11th rd: [1 inc, 9 sc] x6 (66 sc)
12th rd: 66 sc
Trabajando en vueltas cerradas y cambiando de color cada tres vueltas:12th rd: 66 sc
1ª vuelta (vta.) Con blanco, 6 puntos bajos (pb) en anillo mágico.
2ª vta.: 6 aumentos (aum) (Total: 12 pb)
3ª vta.: [1 aum, 1 pb] 6 veces (x6) (18 pb)
4ª vta.: Cambia a negro, [1 aum, 2 pb] x6 (24 pb)
5ª vta.: [1 aum, 3 pb] x6 (30 pb)
6ª vta.: 2 pb, 1 aum, [4 pb, 1 aum] x5, 2 pb (36 pb)
7ª vta.: Cambia a blanco, [1 aum, 5 pb] x6 (42 pb)
8ª vta.: 3 pb, 1 aum, [6 pb, 1 aum] x5, 3 pb (48 pb)
9ª vta.: [1 aum, 7 pb] x6 (54 pb)
10ª vta.: Cambia a negro, 4 pb, 1 aum, [8 pb, 1 aum] x5, 4 pb (60 pb)
11ª vta.: [1 aum, 9 pb] x6 (66 pb)
12ª vta.: 66 pb
12ª vta.: 66 pb

And now the body:
13th and 14th rd: With white, 66 pb
15th rd: With green, chain (ch) 4, double crochet (dc) in the same stitch (st) where the ch come from. *Skip 2 sc, and in the next st work: 1 dc, ch 1, 1 dc (like a V). Repeat from * until the end of the round and join with a slip stitch (sl st) (22 V in total)
16th rd: With red, crochet a 4 st cluster in each chain space from the previous round, and ch 2 between each cluster. (22 clusters in total)
17th rd: With white, sc in each cluster and 2 sc in each 2 ch spaces from the previous round. (66 sc)
18th rd: 66 sc
19th to 21st rd: With black, 66 sc
22nd to 24th rd: With white, 66 sc
25th to 27th: With black, 66 sc
Ahora vamos con el cuerpo:
13ª y 14ª vta.: Con blanco, 66 pb
15ª vta.: Con verde, 4 cadenetas (cad), un punto alto (pa) en el mismo punto (pt) de donde has sacado las cad. *Salta 2 pb, y en el siguiente pt trabaja: 1 pa, 1 cad, 1 pa (formando una V). Repite desde * hasta el final y cierra con un punto raso (pr). (Debes tener 22 V en total)
16ª vta.: Con rojo, tejer un racimo de 4 puntos en cada cad entre pa, y 2 cad de separación entre cada racimo. (22 racimos en total, uno en medio de cada V)
17ª vta.: Con blanco, tejer un pb encima de cada racimo y dos pb en cada espacio de 2 cad de la vuelta anterior (66 pb)
18ª vta.: 66 pb
19ª a 21ª vta.: Con negro, 66 pb
22ª a 24ª vta.: Con blanco, 66 pb
25ª a 27ª vta.: Con negro, 66 pb

- Leaves: 1 double crochet, 1 chain and 1 double crochet in the same stitch. Skip 2 stitches and repeat from the beginning until the end of the round.
- Flower: A 4 stitches cluster in each 1 chain space from the previous round. Chain 2 between each cluster.
- Hojas: 1 punto alto, 1 cadeneta, 1 punto alto en el mismo punto. Salta dos puntos y repite desde el princpio hasta el final de la vuelta.
- Flor: Un racimo de 4 puntos en cada espacio de una cadeneta de la vuelta anterior. Separa cada racimo con 2 cadenetas.


And that's all! I hope you've enjoyed the crochet tulips and the crochet coin purse. Try different sizes of frames and different colours and stitches combinations. You can also add a lining in order to gain more resistance. Possibilities, as always, are endless!
Y esto es todo! Espero que te hayan gustado los tulipanes de ganchillo y el monedero de boquilla. Prueba con otros tamaños de boquillas y distintas combinaciones de colores y de puntos. También puedes ponerle un forro si quieres que quede más resistente. Las posibilidades, como siempre, son infinitas!
15ª vta.: Con verde, 4 cadenetas (cad), un punto alto (pa) en el mismo punto (pt) de donde has sacado las cad. *Salta 2 pb, y en el siguiente pt trabaja: 1 pa, 1 cad, 1 pa (formando una V). Repite desde * hasta el final y cierra con un punto raso (pr). (Debes tener 22 V en total)
16ª vta.: Con rojo, tejer un racimo de 4 puntos en cada cad entre pa, y 2 cad de separación entre cada racimo. (22 racimos en total, uno en medio de cada V)
17ª vta.: Con blanco, tejer un pb encima de cada racimo y dos pb en cada espacio de 2 cad de la vuelta anterior (66 pb)
18ª vta.: 66 pb
19ª a 21ª vta.: Con negro, 66 pb
22ª a 24ª vta.: Con blanco, 66 pb
25ª a 27ª vta.: Con negro, 66 pb
How to add the coin purse frame
Cómo añadir la boquilla al monedero
There're several kinds of frames, that one has holes to attach it to the crochet purse by sewing with the tapestry needle. Check that your needle fits all the holes before starting sewing.
Hay muchos tipos de boquillas, en este caso es troquelada por un lado, para coserla con la aguja. Asegúrate de que la aguja pasa sin dificultad por todos los agujeros antes de empezar a coser.
TULIP STITCH - PUNTO TULIPÁN
- Leaves: 1 double crochet, 1 chain and 1 double crochet in the same stitch. Skip 2 stitches and repeat from the beginning until the end of the round.
- Flower: A 4 stitches cluster in each 1 chain space from the previous round. Chain 2 between each cluster.
- Hojas: 1 punto alto, 1 cadeneta, 1 punto alto en el mismo punto. Salta dos puntos y repite desde el princpio hasta el final de la vuelta.
- Flor: Un racimo de 4 puntos en cada espacio de una cadeneta de la vuelta anterior. Separa cada racimo con 2 cadenetas.
CROCHET CLUSTER - RACIMO
Beginning cluster (the first cluster in the round): Chain 3, yarn over and insert the hook in the same stitch. Pull up a loop. Yarn over and pull through the 2 first loops on the hook. Repeat 2 more times since you have 4 loops on your hook. Yarn over and pull through the 4 loops on your hook.
Regular cluster (the rest of the clusters): Yarn over, insert the hook in next 1 chain space, pull up a loop. Yarn over, pull through the first 2 loops in your hook, repeat 3 more times. Now you have 5 loops on your hook. Yarn over and pull through the 5 loops on your hook. Chain 1.
Racimo de inicio (el primero de la vuelta): Haz 3 cadenetas, coge hebra y entra en el mismo punto. Coge hebra otra vez y saca una lazada. Coge hebra y sácala sólo por las dos primeras lazadas del gancho. Repite esta misma acción 2 veces más hasta tener 4 lazadas en el gancho. Coge hebra y sácala por las 4 lazadas que tienes en el gancho. Haz una cadeneta.
Racimo normal (el resto de racimos): Coge hebra, inserta el gancho en el siguiente espacio de una cadeneta, saca una lazada. Coge hebra de nuevo y sácala por las dos primeras lazadas en el gancho. Repite esto 3 veces mas, hasta tener 5 lazadas en el gancho. Coge hebra y sácala por las 5 lazadas que tienes en el gancho. Haz una cadeneta.
Y esto es todo! Espero que te hayan gustado los tulipanes de ganchillo y el monedero de boquilla. Prueba con otros tamaños de boquillas y distintas combinaciones de colores y de puntos. También puedes ponerle un forro si quieres que quede más resistente. Las posibilidades, como siempre, son infinitas!

Super cute! The tulip stich is adorable!
ReplyDeleteIt is Silvia! i'm trying more experiments with this stitch, and I love the look in all of them. I'll show them to you soon.
DeleteI love this little purse. The tulip stitch is so sweet. Thank you for the pattern!!! Darlene P.
ReplyDeleteI'm glad you liked it Darlene! Thank you for your words :)
DeleteWhat weight cotton are you using. It’s not worsted but would you be using sport weight or fingering weight cotton?
ReplyDeleteI used Cotton 8 from Scheepjes:
Deletehttp://www.scheepjes.com/en/yarn/cotton-8-330/ , wchich is fingering.
Gracias!! Es precioso🌹
ReplyDeleteYes
ReplyDeleteI love the idea of flowers replacing your thoughts with happiness.
ReplyDelete