Showing posts with label Crochet Ganchillo. Show all posts

April 28, 2015

Proud teacher. Blankets vol. 2

I've already told you that my mission on earth is that everybody get to crochet a blanket. That's why I'm building an army to rule the world. Here you have more blankets crocheted by this army of mine. Blankets which I'm as proud as themselves.

Ya os he contado varias veces que mi misión en la tierra es conseguir que todos os tejáis una manta de ganchillo. Y para ello estoy creando un ejército de ganchilleras que dominará el mundo. Aquí os traigo más trabajos de este ejército mío. Trabajos de los que estoy yo tan orgullosa como ellas mismas.
 Blanca's crochet blanket

 Lucía's crochet blanket
 Rosa's crochet blanket

Carmen's crochet blanket

Laura's crochet blanket

April 3, 2015

Proyecto Colcha 2.0, "Meeting Point" Square

THE BLANKET PROJECT
(Crochet Along)

WEEK 3


We've reached the third week! I'm happy with the works you're sending to me, I'm amazed with the variety of colours, you guys really are a source of inspiration! Puff stitch granny (Bubble Wrap), went even better than I expected. Good for you! This week we're learning new techniques, as always. We're crocheting in the round and then we're going to square the circle. Yes, you can.

We're going to use 2 colours and, as I always say, use your own but try to choose 2 very contrasting colours; remember that contrast is the aim of this  crochet blanket. Actually, it's so about contrast that I've named this square "Meeting Point" after this huge red circles that you see in maps, indicating meeting points and saying "You are here".

Ya estamos en la tercera semana!!! Voy viendo los trabajos que me mandáis y estoy feliz! Estoy viendo combinaciones de colores maravillosas, siempre me sorprendéis! Las avellanas de la última semana con la aplicación "Bubble Wrap" fueron mucho mejor de lo que esperaba, enhorabuena! Esta semana vamos a aprender una técnica nueva, como siempre. Vamos a tejer en redondo y luego vamos a cuadrar ese círculo.

Para ello vamos a usar dos colores, y, como siempre os digo, podéis usar los colores que os gusten pero recordar que este proyecto está basado en el contraste, y en esta aplicación es básico. Fijaos si es importante el contraste que la he llamado "Meeting Point" porque me recuerda a esos círculos que ponen en los mapas para indicar el punto de encuentro o el típico "usted está aquí"... Preparadas? Vamos allá!


Let's start crocheting a flat circle with the proportional increasing technique that we've already seen:


  • 1st round(rd): Chain (ch) 3 (count as a double crochet) and 11 double crochet (dc) in a magic ring. Join with a slip stitch (sl st). (12 dc in total)
  • 2nd rd: Ch 3 (count as a dc) and dc in the same stitch (st). 2 dc in each st. Join with a sl st. (24 dc in total)
  • 3rd rd: Ch 3 (count as a dc) and 2 dc in the next st. * 1 dc in next st, 2 dc in next st, repeat from * 10 more times and join with sl st. (36 dc in total)
  • 4rth rd: Ch 3 (count as a dc), 1 dc in next st, 2 dc in next st, *1 dc, 1 dc, 2 dc in the same st, repeat from * 10 more times and join woth sl st. (48 dc in total)

Empezaremos tejiendo un círculo plano con la técnica del aumento proporcional que ya vimos anteriormente:


  • 1ª Vuelta (vta.): 3 cadenetas (equivalen a un punto alto) y 11 puntos altos (pa) en anillo mágico. Cerramos la vta. con un punto raso (pr). (12 pa en total)
  • 2ª vta: 3 cadenetas (cad) (equivalen a un pa) y un pa en el mismo punto.  2 pa en cada uno de los siguientes 11 puntos. Cerramos la vta con un pr. (24 pa en total)
  • 3ª vta.: 3 cadenetas (cad) (equivalen a un pa) y 2 pa en el siguiente punto. *1 pa en el siguiente punto, 2 pa en el siguiente punto, repetir desde * 10 veces más y cerrar la vta. con punto raso (36 pa en total)
  • 4ª vta.: 3 cadenetas (cad) (equivalen a un pa), 1 pa en el siguiente punto, 2 pa en el siguiente punto, *1 pa, 1 pa, 2 pa, repetir desde * 10 veces más y cerrar la vta. con pr cortar la lana y cambiar de color. (48 pa en total)


Once the circle is finished, let's square it! With the contrast colour:

  • 1st rd: Ch 1, single crochet (sc) in the same st, 1 sc, * 1 half double crochet (hdc), 1 hdc, 1 dc, 1 dc, in the next stitch: 2 triple crochet (tr), ch 3, 2 tr (that would be the corner), 1 dc, 1 dc, 1 hdc, 1 hdc, 3 sc, repeat 3 times from *  but finish with just 1 sc instead of 3 and join with a sl st with the first st.
  • 2nd rd: Ch 3 (count as a dc), 7 dc, now in the 3 ch space from previous round we're going to crochet the corner (2 dc, ch 3, 2 dc), * 15 dc, corner, repeat 2 times from *, 7 dc, join with a sl st.
  • 3rd rd: Ch 3 (count as a dc), 9 dc, corner, * 19 dc, corner, repeat 2 times from *, 9 dc, join with a sl st.


Una vez terminado nuestro círculo, vamos a transformarlo en cuadrado. Con el nuevo color:

  • 1ª Vta.: 1 cadeneta (cad) y un punto bajo (pb) en el mismo punto, 1 pb, *1 punto medio alto (pma), 1 pma, 1 pa, 1 pa, en el siguiente punto: 2 puntos altos dobles (pad) , 3 cad, 2 pad en el (esto sería una esquina), 1 pa, 1 pa, 1 pma, 1 pma, 3 pb, repetir desde * 3 veces pero termina sólo con 1 pb en vez de 3 y une con pr con el primer pb.
  • 2ªVta.: 3 cad (equivalen a un pa), 7 pa, en el espacio de 3 cad de la vuelta anterior teje la esquina ( 2 pa, 3 cad y 2 pa), *15 pa, esquina, repetir 2 veces desde *, 7 pa, cierra con un pr.
  • 3ª vta.: 3 cad (equivalen a un pa), 9 pa, en el espacio de 3 cad de la vuelta anterior teje la esquina ( 2 pa, 3 cad y 2 pa), *19 pa, esquina, repetir 2 veces desde *, 9 pa, cierra con un pr.

Make 4 crochet squares: one red and salmon, one white and blue, one black and white and one turquoise and neon pink.

Teje 4 aplicaciones: Una roja y salmón, una blanca y azul, una negra y blanca, una turquesa y rosa neón:


What do you say? You don't remember the crochet basic stitches
Ok.... here you have a reminder...

Cómo dices? Que no te acuerdas de los puntos básicos del ganchillo
Bueeeeeno veeeenga, te los recuerdo...

HALF DOUBLE COCHET - PUNTO MEDIO ALTO

Yarn over (yo), insert the hook in the indicated st and pull up a loop. Now you have 3 loops, yo and pull up a loop through the 3 loops. 

Coge hebra, inserta el gancho en el punto indicado y saca hebra. Ahora tienes 3 lazadas en el gancho, coge hebra y sácala por las 3 lazadas a la vez.


DOUBLE CROCHET - PUNTO ALTO

Yo, insert the hook, pull up a loop. Now you have 3 loops on your hook, yo and pull up a loop through the first 2 loops on the hook, yo again and pull up a loop through the remaining 2 loops.

Coge hebra, inserta el gancho en el punto indicado, saca una lazada. Ahora tienes 3 lazadas en el gancho. Coge hebra y sácala por las dos primeras lazadas. Vuelve a coger hebra y sácala por las dos lazadas restantes.


TRIPLE (TREBLE) CROCHET - PUNTO DOBLE ALTO

Yo twice before  inserting the hook and pull up a loop. Now you have 4 loops on your hook. Yo, pull up a loop through the forst 2 loops on your hook. Repeat 2 more times.

Coge hebra 2 veces. Inserta el gancho en el punto indicado y saca una lazada. Ahora tienes 4 lazadas en el gancho. Coge hebra y sácala por las dos primeras lazadas, repite esto mismo dos veces más.


REVIEW OF YOUR WORKS

And now is your time, let's enjoy your "Rugby League" Squares. (Thanks to Clara, Elvira, Delia, May, raquel, etc... for sending me the pictures! If you want to send me pictures of your work do it here: proyectocolcha@gmail.com)

Y ahora vamos a disfrutar de algunos de vuestros trabajos de la aplicación "Rugby League". (Gracias Clara, Elvira, Delia, May, Raquel, etc... por enviarme las fotos fotos! Si quieres enviarme fotos del proceso de tu colcha puedes hacerlo a proyectocolcha@gmail.com)


Remember using #proyectocolcha hashtag if your sharing your crochet squares on instagram!

RRecuerda usar el hashtag #proyectocolcha si vas a compartir tus aplicaciones en instagram


That's all folks! Another crochet square coming soon, you're gonna love it!
Crochet long and well! Send me pictures!!!!

Pues esto ha sido todo por hoy. Dentro de poco una aplicación nueva que os va a encantar, ya veréis!
  Tejed mucho y bien! Enviadme fotos!!!!

Do you want to join our crochet along? Then do it!

Quieres participar en nuestro crochet along? Pues hazlo!

March 31, 2015

Proud teacher. Home decor vol. 1

Today in Proud Teacher: My students as homestylers! There are no limits for them, they know no fear, they know what they want and they crochet it! If you have pictures of your works made following my patterns, I'd love to see them. Feel free to send them to my facebook or to proyectocolcha@gmail.com

Sigo empeñada en mataros de envidia con las monadas que hacen mis alumnas, esta vez con adornos para el hogar. Algunos de ellos tienen tutorial en mi blog, encontraréis el link ahí. Son unas máquinas, qué os voy a decir! Recuerda que si tienes fotos de trabajos realizados siguiendo mis tutoriales me encantará verlas! Mándamelas por facebook o a proyectocolcha@gmail.com


 Ana's flower pot cozy


Barbara's can cozy

March 17, 2015

Proyecto Colcha 2.0, "Bubble Wrap" Square

THE BLANKET PROJECT
(Crochet along)

WEEK 2


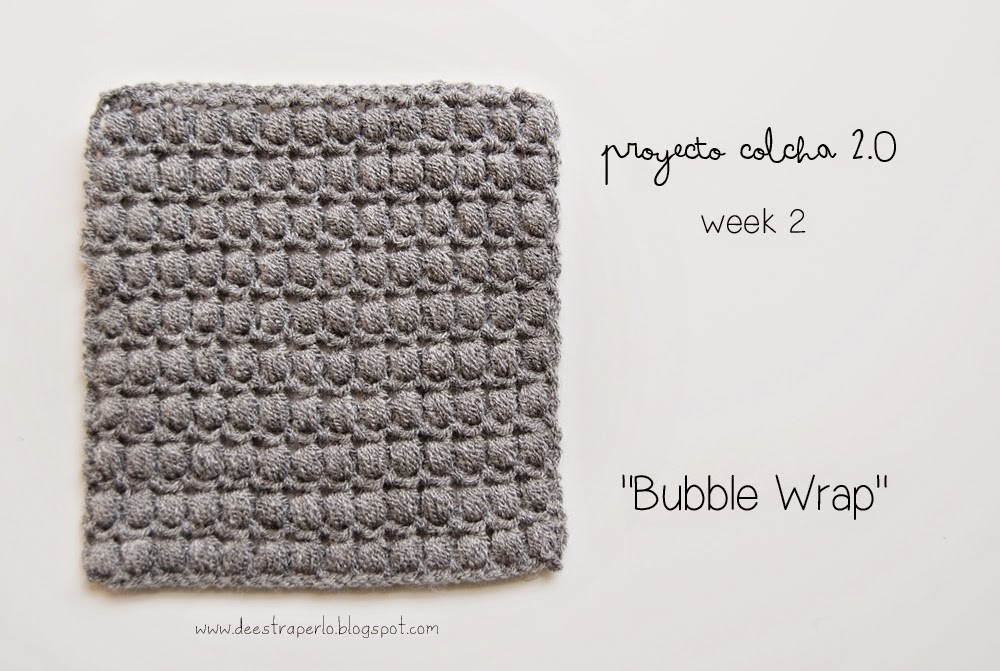
Tell me, tell me!! How was last week with your "Rugby League" Granny Squares? Was it ok? Have you crochet the 4 of them already? I'm anxious to see your works! Today we go on with our project with this square that I love. It's monochrome so its focus is on the texture that the puff stitch provides. And just because of that I recommend you to use a neutral colour (grey in my case). I've named it "Bubble Wrap" because it reminds me of the plastic bubbles wrap... 

Bueno, contadme! Cómo fue la semana pasada con vuestros "Rugby League"? Ha ido bien la cosa? Habéis tejido ya los 4? Estoy impaciente por ver los resultados! Hoy continuamos con nuestro proyecto con una aplicación que me encanta. Es monocromática, por lo que su punto fuerte es la textura que le proporciona el punto de avellana (o punto garbanzo). Y precisamente para resaltar más esta cualidad yo os recomendaría que la hagáis en un color neutro, en mi caso he usado el gris. La he llamado "Bubble Wrap", porque me recuerda mucho al plástico ese de burbujas que utilizamos para envolver cosas frágiles.


Ok, let's go then:
Foundation row: 30 chains (ch)
1st row: 1 single crochet (sc) in de 2nd ch from the hook, * 1 ch, skip next ch, sc in next ch. Repeat from * until the end of the row.
2nd row: ch 2 (count as a half double crochet), skip the first sc, puff stitch in the next chain space, *ch 1, skip 1 sc, 1 puff stitch in the next ch space, repeat from * until the last puff stitch, 1 half double crochet in last stitch. (14 puff stitch in total)
3rd row: ch 1, 1 sc in first stitch (st), *ch 1, 1 sc in next ch space between puff stitches, repeat from * until the end. (Make last sc in the space between the last puff stitch and the 2 initial chains that count as a half double crochet.)
Rows 4, 6, 8, 10, 12, 14, 16, 18, 20: Repeat 2nd row
Rows 5, 7, 9, 11, 13, 15, 17, 19, 21: Repeat 3rd row


Pues vamos al lío:
Cadeneta de inicio: 30 cadenetas (cad)
1ª fila: 1 punto bajo (pb) en la segunda cad a partir del gancho, *1 cad, saltamos la siguiente cad, pb en la siguiente cad. Repite desde * hasta llegar al final de la fila.
2ª fila: 2 cad (equivalen a un punto medio alto), saltamos el primer pb, avellana en el siguiente espacio de cad, *1 cadeneta, saltamos 1 pb, 1 avellana en el siguiente espacio de cad, repite desde * hasta la última avellana, 1 punto medio alto en el último punto. (14 avellanas en total)
3ª fila: 1 cad, 1 pb en el primer punto, *1 cad, 1 pb en el siguiente espacio de cad entre avellana y avellana, repetir desde * hasta el final. (Haz el último pb en el espacio entre la última avellana y las dos cadenetas iniciales que equivalen a un punto medio alto.)
Filas 4, 6, 8, 10, 12, 14, 16, 18, 20: repetir la 2ª fila
Filas 5, 7, 9, 11, 13, 15, 17, 19, 21: repetir la 3ª fila

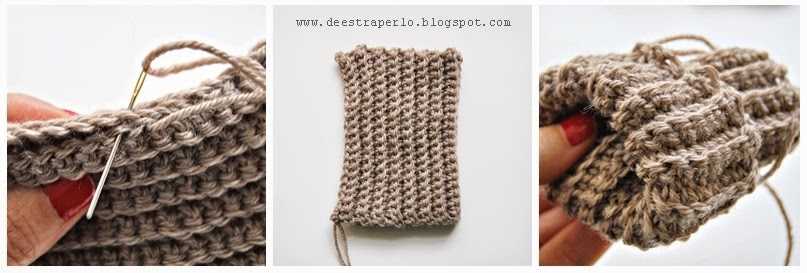
Problems with the puff stitch? Let's have a quick review:
Problemas con el punto avellana o garbanzo? Un repaso rápido:


Yarn over, insert the hook in the indicate stitch and pull up a loop. Repeat this 3 steps 3 more times (4 in total). Now you have 9 loops in your hook, yarn over and pull up a loop through all the 9 loops in your hook. Chain one. (In this pattern you're asked to chain 1 after the puff stitch, so it would be 2 in total, the puff stitch chain, and the other one.)

Coge hebra, introduce el gancho en el punto indicado, coge hebra y saca una lazada. repite estas 3 acciones 3 veces más (4 en total). Ahora tienes 9 lazadas en el gancho. Coge hebra y saca por las 9 lazadas de golpe. Haz una cadeneta. (En este patrón además te pido que hagas una cadeneta tras terminar tu avellana, por lo que serían 2 cadenetas, la de la avellana y la que te pido yo)


Now crochet 5 more squares, 6 in total. 3 in dark grey, 3 in light grey.
Ahora teje 5 aplicaciones más, 6 en total. 3 en gris oscuro y 3 en gris claro.


See you soon with a new square! Enjoy your puff stitches! Send me pictures of your works!!!!!!!

Nos vemos pronto con la siguiente aplicación! Disfruta de tus avellanas! Enviadme fotossssss!


Do you want to join our crochet along? Then do it!

Quieres participar en nuestro crochet along? Pues hazlo!

February 27, 2015

Proud teacher. Stay warm vol. 1

More works made by my students and friends. Aren't they awesome? And what about Susana, the cat? Does she like wearing the owl hat or doesn't she? I'm not sure..., what do you think?

I can't believe how different this fingerless gloves can be depending on who make them and the colours you use! It seem the simplest pattern ever, but yet you can get very different effects.

Well, enjoy this girls work, because it's worth!

Más trabajos hechos por mis alumnas y amigas. No son chulísimos? Y qué me dices de Susana, la gata? Le gusta llevar el gorro o no? No lo tengo muy claro..., tú qué crees?

No puedo creer los diferentes resultados que se consiguen con los mitones depende de quién los teja y los colores que use. Parece el patrón más sencillo del mundo, pero de eso nada...

Bien, disfrutad del trabajo de estas chicas, porque merece la pena!


 Claudia's owl hat

Elvira's poncho

Rosa's crochet hat

Flor's fingerless gloves

February 20, 2015

Back Loop fingerless gloves

HOW TO CROCHET FINGERLESS GLOVES IN BACK LOOP


Before the cold is over I would like to show to you how to crochet this "very quick and easy crochet fingerless gloves". Two pieces, the cuffing and the glove, both in single crochet only in back loops, but with a very different effect since one is crocheted in rows and the other one in the round.

Antes de que se acabe el invierno quiero enseñaros a hacer estos mitones super fáciles y rápidos. Constan de dos partes, el puño y el guante. Ambas partes están tejidas con punto bajo por detrás de la lazada, pero como veréis los resultados son totalmente diferentes, ya que uno está tejido en filas de ida y vuelta y otro en vueltas en espiral.


You'll need: 4mm (G/6) crochet hook, yarn in colours brown A, green B, white C, ocher D, 6 buttons, scissors, stitch marker, tapestry needle

Materiales necesarios: Ganchillo de 4 mm, lanas de colores marrón A, verde B, blanco C, ocre D, 6 botones, tijeras, marcador, aguja lanera


Abbreviations:

BL In back loops
CH Chain
SC Single Crochet
SL ST Slip stitch
ST Stitch

Abreviaciones:

BL Por detrás de la lazada
Cad Cadeneta
PB Punto bajo
PR Punto raso
PT Punto
VTA Vuelta


The cuffing is a 18cm x 10,5cm (7"x 4") piece in ribbing stitch.

Foundation row: Chain 21
Row 1: 20 single crochet (sc)
Roows 2 to 32: Chain 1, 20 sc only in back loops (BL)
Fasten off.

Once you've finished your piece, join the first and the last row with the tapestry needle forming a cylinder, and turn it over. 

El puño es una pieza de punto elástico de 18cm x 10,5cm aproximadamente, tejida en punto elástico.

Cadeneta base: 21 cadenetas
Fila 1: 20 puntos bajos (pb)
Filas 2 a 32: 1 cadeneta, 20 pb tejidos por detrás de la lazada. (BL)
Corta el color B.

Una vez terminada  nuestra pieza unimos la primera y la última fila con la aguja lanera formando un cilindro y le damos la vuelta.


The cuffing is done, let's start the glove:

Joining round: First of all we're going to crochet a slip stitch round in one of the cylinder edges, in order to get a neat division between both parts. Join color B and make slip stitches (sl st) all around the cuffing end, one sl st per cuffing row. As you have 32 cuffing rows you must have 32 sl st, but you'll have to add 2 more because the piece grows a little when sewing the two edges to form the cylinder. So you should have 34 sl st at the end of the round. Join the first sl st with the first sl st with a sl st a,d chain 1. Using a stitch marker will help you counting rounds.
Round 1: (from now on work in spiral) Sc in each sl st (34 sc)
Rounds 2 to 5: sc in each stitch (st), in BL (34 sc) 
Rounds 6 and 7: Join colour Csc in each st, in BL (34 sc) 
Round 8 (thumb hole): Chain 5, skip 7 sc, sc in the next sc and in every sc around, in BL.(5 chains and 27 sc)
Round 9: 7 sc over the 5 chains, sc in next sc and in every sc around, in BL. (34 sc)
Round 10sc in each st, in BL (34 sc) 
Rounds 11 to 15: Join colour Dsc in each st, in BL (34 sc) 

El puño ya está, vamos con el guante:

Vuelta de unión: Primero vamos a tejer una fila de punto raso (pr) alrededor de uno de los extremos del cilindro para obtener una división bien pulcra. Une el color B y teje pr alrededor del puño, un pr por cada fila del puño. Como tienes 32 filas en el puño, deberías tener 32 pr, pero tendrás que añadir 2 más ya que la pieza crece un poco al coser los dos extremos para formar el cilindro, por lo que al final tendrás 34 pr. Une el primer y el último pr con otro pr y haz una cadeneta. Usar un marcador te ayudará a contar las filas.
Vuelta 1: ( a partir de ahora trabajaremos en espiral) Pb en cada pr (34pb)
Vtas. 2 a 5: pb en cada punto en BL (34pb)
Vtas. 6 y 7: Une el color C, pb en cada punto, en BL (34pb)
Vta. 8 (agujero para el pulgar): Haz 5 cadenetas, salta 7 pb, pb en el siguiente punto y en cada punto alrededor, en BL (5 cadenetas y 27 pb)
Vta. 9: 7pb sobre las 5 cadenetas, pb en el siguiente punto y en cada uno alrededor, en BL. (34pb)
Vta. 10: pb en cada punto, en BL. (34pb)
Vtas. 11 a 15: Une el color D, pb en cada punto, en BL (34pb)


Make 2 and add the buttons in the opposite side of the thumb hole.

Haz dos piezas iguales y cose los botones, en el lado contrario del agujero para el pulgar.


Try different hooks and yarns, and different colour combinations. There're endless possibilites!!

Prueba distintos tamaños de aguja, distintos hilos y distintas combinaciones de color, las combinaciones son infinitas y podrás lucir guantes nuevos con cada modelito.


More pictures in instagram!

Related Posts Plugin for WordPress, Blogger...