Showing posts with label Recycling. Show all posts

February 9, 2020

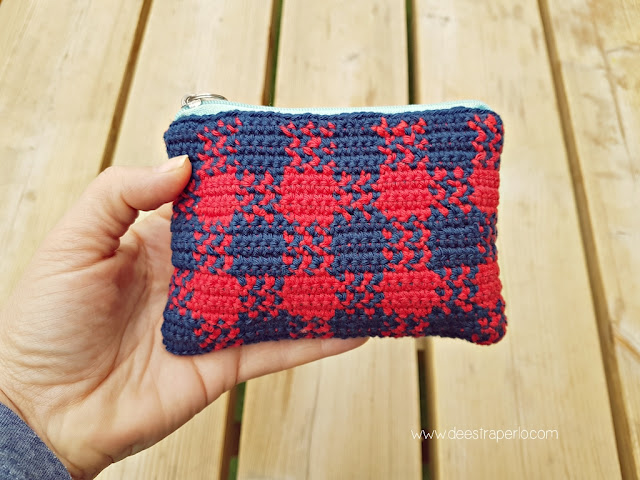
Purse crochet cover

Do you know this feeling, when you suddenty have the urge of finishing all your UFOS? Of course you know it, we all know it. As well as we know that this feeling just lasts a few days, maybe weeks. Make it a month, maybe two if you're very well determined... but I seriously doubt it lasts more than that.

Well, this is what I'm experiencing right know. All my yarn boxes and project bags are a mess but I'm feeling so Marie Kondo that I'm trying to fix that mess. Will I make it? Don't think so, but at least I'll try.

El espíritu del orden y la organización se ha apoderado de mí. No hice propósitos de año nuevo, hice propósitos de vida nueva y estos conllevan organizar el caos lanero y terminar todo lo que tengo a medias. ¿Os suena esto de algo? 

Laura Algarra lleva un tiempo ayudándonos con su "dieta de ovillos" por lo que yo he empezado a poner en práctica mis patrones de aprovechamiento, terminando proyectos pendientes con los restos de lanas que rondan por mi casa. ¿Lo conseguiré? Pues no creo, pero por lo menos durará unas semanas y algo haremos.


So in one of those little bags full of don't-know-exactly-what I found 2 ugly old purses that I bought a few years ago pretending to cover them with cute tapestry crochet. And today, my ladies, the day has arrived. No more wondering-around is allowed. Open all your drawers and bags and look for an old purse that could need a make over.

Haciendo orden encontré unas viejas carteras que conservaba con la intención de forrarlas y darles una nueva vida, mucho más chic y glamourosa. Hacía ya más de 2 años que estaban guardadas... "Ay, tengo que hacer esto. Ay, tengo que terminar aquello" Así todo el día. Se acabó. Ha llegado el momento. Los monederos se hacen hoy. Así que ponte a buscar por tu casa antiguos neceseres, monederos, carteritas... y ¡manos a la obra!


WHAT WILL YOU NEED?
- A purse
- Cotton yarn scraps (I've used Scheepjes 8)
- Crochet hook (If you're crochetting tapestry try with a smaller hook than recommended, I'm using 2mm)
- Tapestry needle
- Sewing thread and needle
- A nice and sweet afternoon snack and a hot beverage just to make the whole experience even better.

¿QUÉ NECESITARÁS?
- Monedero
- Restos de algodón (Yo he usado restos de Scheepjes 8)
- Aguja adecuada para  el material que hayas escogido. (Si vas a hacer tapestry, mejor usa una aguja medio punto o un punto menos a la indicada, yo he usado una de 2mm)
- Aguja lanera
- Aguja e hilo de coser
- Merienda rica para hacer la experiencia aún más perfecta.


Picnic pattern:
The foundation chain should be multiple of 8 and it has to be as long as twice the base of the purse. In my purse I needed 32 chains to reach the lenght of the purse, so my foundation chain is 64. It's better to make it a little larger than the purse, 1 or 2cm, because the tapestry tends to stretch too much.
Now add 1 more chain.

Para el estampado Picnic:
Teje una cadeneta múltiplo de 8 igual de larga que el doble de la base del monedero. En mi caso con 32 cadenetas alcanzaba la longitud de la base del monedero por lo que hice 64. Es recomendable que sea por lo menos 1 o 2 cm mayor que el monedero, ya que al tejer en tapestry se encoje mucho.
Ahora añade una cadeneta más.

First thing to know about tapestry crochet is how to change colour: You should close the last stitch always with the new colour. That's to say, as you can see in the picture, if you're working with the pink thread, close the last stitch with the brown thread, and then keep working with brown.
Tapestry crochet is always worked with two or more colours, but instead of fasten them off each time you change, you have to keep carrying them, hidden inside the single stitches. Even when you change rows.

La técnica de Tapestry permite crear dibujos combinando diferentes colores en una misma fila. Para ello interpretamos cada punto como si fuese un píxel o uno de los cuadraditos en un papel cuadriculado. Es importante tener en cuenta que el cambio de color se hace cerrando el último punto de un color con el siguiente color a usar. En el ejemplo vemos como vamos a cambiar de blanco a turquesa por lo que el último punto en blanco lo cerramos ya con turquesa. El color que no se está usando irá siempre metido entre los puntos, es decir, se teje envolviendo la hebra.
This pattern combines 4 row blocks, alternating 4 white stitches and 4 turquoise stitches or 4 turquoise stitches and 4 navy blue stitches. Switch colors every 4 rows, as you can see on the picture below, until you reach the purse heigth. Remember always to start the rows with 1 chain.
Now you can embroider some flowers.

Este estampado combina bloques de 4 filas, alternando 4 puntos blancos con 4 puntos turquesa o 4 puntos turquesa con 4 puntos azul marino. Ve cambiando cada 4 filas, según muestra la foto, hasta alcanzar la altura del monedero. Recuerda siempre empezar las filas tejiendo una cadeneta.
Ahora puedes bordar unas florecitas si te apetece darle más aspecto primaveral. Son unos puntos muy básicos de bordado, ¡anímate a probarlo!


Once your piece is finished, fastened off and embroidered, fold in half and using the tapestry needle sew the base and the side, forming a small bag.

Una vez terminado, rematado y bordado tu rectángulo, dóblalo por la mitad y con la aguja lanera cose el lateral y la base formando un saquito.


Insert now the purse inside the little crochet bag you've formed and using the sewing needle and thread, sew it to the zipper.

A continuación mete el monedero en el saquito de ganchillo y con el hilo y aguja de coser cose todo el borde a la cremallera. Como ves, no puede ser más fácil.


For the other version of gingham, your foundation chain should be multiple of 10. Switch every 5 rows and make blocks of 5 stitches. As you can see there are blocks mixing red and navy blue. Just make one stitch in each color and make it the other way around in the next row.

Esta otra variante de cuadros de vichy está hecha con una cadeneta base de múltiplos de 10. En este caso los cadraditos son de 5 puntos en lugar de 4, y en los cuadrados en los que se mezcla el azul con el rojo se teje un punto de cada color, alternando en cada fila. Cambiamos cada 5 filas. Sigue el esquema que ves en la foto, es muy sencillo.


Try all kind of patterns and combinations of squares and rows. Gingham combinations are endless and always beautiful. And tapestry crochet offers an excellent finishing.

Prueba todo tipo de estampados y combinaciones de cuadros y filas. El vichy es infinito y siempre precioso y la técnica de tapestry crochet nos permite imitarlo y conseguir muy buenos resultados.


Now that you're an expert you can step up a level and try your new skills making this super easy amigurumi, Picnic Cat. It's also a very nice project in order to finish scraps of yarn that you have at home, since you can use any size of hook, any kind of thread. It'll always look good.


Y si te has quedado con ganas de practicar el estampado Picnic, puedes continuar con el Gato Picnic, también genial para acabar con restos de algodones que tengas por casa ya que lo puedes tejer en cualquier tamaño y con cualquier material. ¡Siempre queda bonito!. Encontrarás el patrón aquí (también incluye los banderines) y está disponible en español, inglés, francés, italiano, alemán y holandés.

April 7, 2019

Cuteness Undercover

Do you trust me?

If you've nodded, or clapped or stood straight and yelled "Sir, yes sir", then you've made the right choice. Because what's going to happen here it's going to be good, very good.

My beloved friends, it's my pleasure to present the very new section of the blog...

¿Confías en mi? 

Si has asentido con la cabeza o aplaudido entusiasta a la pantalla o te has puesto firme y has gritado "Señor, sí señor", has hecho bien. Porque lo que va a pasar a continuación va a ser bueno y divertido.

Queridas amiguitas, empieza la primera edición de...


Wait, what? Ok, ok. Cuteness Undercover it's a series of super cute little tutorials that I'll be revealing little by little. Why don't posting all of it at once, instead of messing with you? Well, first of all because I just love messing with you. Besides, this way I'll have more posts to share and you won't get tired since you'll have time enough to make your homework.

But, don't worry if you're one of this lazy or untrusting people. In that case you can just wait till all the tutorials has been published and make the whole thing in one afertoon. But, between you and me, where is the fun in that?

My design for this first "Cuteness Undercover" joins corchet and crockery (whaaat?!) You're going to love this project and you can make it fast and easily.

¿Cómo? ¿Mande? Voy, voy. Las Monerías Clandestinas son pequeños tutoriales que iré desvelando poco a poco. ¿Porqué no lo publico todo de golpe y me dejo de pamplinas? Pues porque me gusta haceros sufrir, básicamente. Además, así dura más, me da para más posts y no os casáis mucho ya que tendréis harto tiempo para hacer los deberes de una entrega a otra. 

Si te da pereza mortal o eres de esas desconfiadas que hasta que no lo veas no lo creas, debes saber que va a ser tan mono que no vas a poder resistirte. En cuánto lo veas entero vas a querer hacértelo. 

Mi propuesta para este primer "Monerías Clandestinas" aúna ganchillo y menaje del hogar. (Qué?!)  Se trata de una pieza que va a enamorar a pequeños y mayores y que podéis elaborar muy rápidamente, ya que es super fácil.

TECHNICS WE'RE GOING TO USE
TÉCNICAS QUE VAMOS A PRACTICAR


- Magic ring
- Colour changing (see picture above)
- Proportional increasing
- Increasing and decreasing

- Anillo mágico
- Cambio de color (ver foto de arriba)
- Aumento Proporcional
- Aumento y disminución


MATERIALS WE'RE GOING TO NEED
MATERIALES QUE VAMOS A NECESITAR


- A small plate, about 15 cm in diameter. (You can buy one or use an old one. But cute, it has to be cute!)
- A 2,5mm crochet hook.
- Cotton yarn in several colours ( white, navy blue, red, brown, blue...)
- A bit of polyfill stuffing 
- Scissors
- Tapestry needle
- Fabric glue or silicone

- Un plato pequeño, unos 15 cm de diámetro. (Puedes comprar uno o puedes usar uno viejo que tengas por casa. ¡Pero que sea mono!)
- Ganchillo de 2,5mm
- Algodón adecuado para el ganchillo, en varios colores (blanco, azul marino, rojo, marrón, azul...)
- Un poquito de relleno
- Tijeras
- Aguja lanera
- Pegamento textil o silicona


This is a perfect project for all those who want to try the art of amigurumi as well as those who'd like to go one step beyong.

I leave you in peace now, but just for a few days, so you can gather all the things you need and I'll be back soon with the first excersise.

Es un proyecto perfecto para quien se quiera iniciar en el mundo del amigurumi y para todas aquellas personas a las que les guste ir un paso más allá y darle otra vuelta de tuerca a las cosas.

Os dejo unos días para que vayáis reuniendo los materiales y vayáis entrenando y en seguida vuelvo ya con los primeros ejercicios.

April 19, 2018

Upcycling cans with crochet tulip stitch

I had something to confess. I'm becoming really obsessed with recycling. A few time ago I started being interested in the Zero Waste Movement and to me it has became a goal. I know it's not an easy one, but at least it's worth trying.

One of the tips I'm using to get to that point is imagining that I'm not able no get rid of all the trash that I generate in one day, and I have to keep it at home. How would I manage it? Nice one, uh? I accept all kind of tips and ideas!

Tengo que confesaros una cosa. Estoy obsesionándome con el reciclaje. Hace ya tiempo que tengo como objetivo la reducción de residuos, pero cuesta mucho y acabo acumulando algunos plásticos y latas. Eso si, cada vez menos y cada vez con más conciencia.

Uno de los trucos que uso para ello es imaginarme que no tuviese la opción de tirar la basura y la tuviese que acumular en casa. Así que intento pensar cómo podría reutilizar ese trozo de metal o plástico. No se me ocurren cosas muy fácilmente, por lo que acepto todo tipo de consejos y trucos que podáis darme.


One of the resources that I've been using it's reusing jars and cans  y covering them with crochet. I made a tutorial about this a long time ago (the easiest tutorial ever, I guess). 

This covered cans and jars make a perfect gift, you can fill them with cookies, candies or any other treat; and they are also very useful at home to put your hooks, pens, makeup stuff, kitchen accesories...

Uno de los recursos que uso desde hace tiempo, y me he propuesto hacerlo cada vez mas, es reutilizar botes y frascos forrándolos con ganchillo. Ya os hice un tutorial (probablemente el tutorial más fácil del mundo) hace unos años. Y, que sepáis todos los que me rodeáis, que durante un tiempo este va a ser el regalo de cumpleaños que vais a recibir. Eso si, os las rellenaré de caramelos, galletas u otros artículos de interés.

Bueno..., si llego a regalároslas, porque en casa me vienen muy bien, la verdad. Para los ganchillos, los lápices, maquillajes varios, utensilios de cocina... Y siempre tengo alguno lleno de cosas que no se dónde poner, tipo botones, clips, pilas, imperdibles, algún chicle. A que si? Tú también, reconócelo.


So, today, I'm recycling two tutorials in order to make a tutorial about recycling. How about that? If you mix Crocheted cover cans + Crochet tulip coin purse, what do you get?  Upcycled cans with crochet tulip stitch!! I know, it's awesome, like magic.

Así que hoy os traigo el colmo de los colmos: reciclando dos antiguos tutoriales, creo uno nuevo que nos sirve para reciclar latas y botes de conservas. Cuáles son estos dos antiguos tutoriales? Latas forradas con ganchillo + Monedero de tulipanes con boquilla = Latas forradas con tulipanes. Qué te parece?


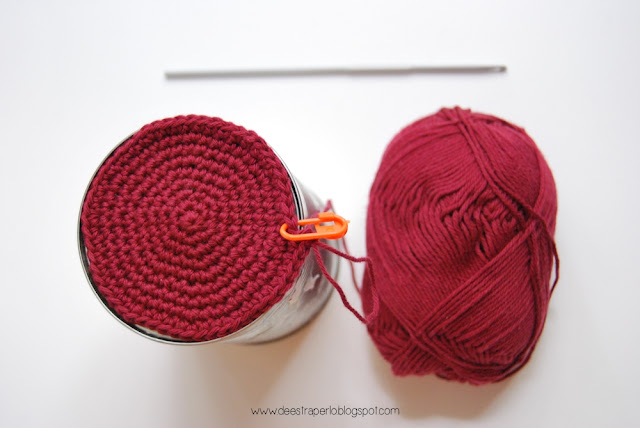
To make the base we're going to crochet a flat circle, working in spiral. We're going to use the proportional increase that we learnt before.

1st round: 6 single crochet in a magic loop.
2nd round: 6 increases (12 single crochet) (see here how to increase)
3rd round: [1 single crochet (sc), 1 increase (inc)] repeat x5 times (18sc)
4th round: [2 sc, 1 inc] x5 (24 sc)
5th round: [3 sc, 1 inc] x5 (30 sc)
6th round: [4 sc, 1 inc] x5 (36 sc)
7th round: 36 sc in back loops.

IMPORTANT: For the Tulip Stitch, the number of stitches in the last round  of the base must be a multiple of 3. If it's not, you should increase 1 or 2 stitches in the last row in order to get the amount you need. (If your first round has 6 stitches, as in the example, you shouldn't have any problem) 

Para hacer la base vamos a hacer un círculo plano en espiral. Para ello usaremos el aumento proporcional que ya aprendimos en un tutorial anterior.

1ª vuelta: 6 puntos bajos en anillo mágico.
2ª vta.: 6 aumentos (12 puntos bajos) (si no sabes cómo aumentar, puedes consultar este tutorial)
3ª vta.: [1 punto bajo (pb), 1 aumento (aum)] repetir x5 veces (18 pb)
4ª vta.: [2 pb, 1 aum] x5 (24pb)
5ª vta.: [3 pb, 1 aum] x5 (30pb)
6ª vta.: [4 pb, 1 aum] x5 (36pb)
7ª vta.:36 pb por detrás de la lazada.

IMPORTANTE: Para el Punto Tulipán, el número final de puntos debe ser múltiplo de tres. Si tu círculo final no cumple esta características, haz uno o dos aumentos en la última fila hasta conseguir un número de puntos múltiplo de 3. (Si la primera vuelta la haces de 6 puntos bajos, como yo en este ejemplo, no debes tener problemas para que el número final sea múltiplo de 3.)


Now, keep working in spiral alternating single crochet rounds with tulip crochet rounds. Combine colors, stripes, stitches. Get fun and try new combinations that you won't never imagine. Step away from your comfort zone!

Ahora sigue trabajando en espiral, alternando vueltas de puntos bajos con vueltas de Punto Tulipán. Combina colores y frecuencias y obtén botes totalmente diferentes. Atrévete a innovar e inventar. Mezcla colores imposibles, sal de tu zona de confort!


TULIP STITCH - PUNTO TULIPÁN

Leaves: 1 double crochet, 1 chain and 1 double crochet in the same stitch. Skip 2 stitches and repeat from the beginning until the end of the round.
Flower: A 4 stitches cluster in each 1 chain space from the previous round. Chain 2 between each cluster. 

Hojas: 1 punto alto, 1 cadeneta, 1 punto alto en el mismo punto. Salta dos puntos y repite desde el princpio hasta el final de la vuelta.
Flor: Un racimo de 4 puntos en cada espacio de una cadeneta de la vuelta anterior. Separa cada racimo con 2 cadenetas.


CROCHET CLUSTER - RACIMO 

Beginning cluster (the first cluster in the round): Chain 3, yarn over and insert the hook in the same stitch. Pull up a loop. Yarn over and pull through the 2 first loops on the hook. Repeat 2 more times since you have 4 loops on your hook. Yarn over and pull through the 4 loops on your hook.
Regular cluster (the rest of the clusters): Yarn over, insert the hook in next 1 chain space, pull up a loop. Yarn over, pull through the first 2 loops in your hook, repeat 3 more times. Now you have 5 loops on your hook. Yarn over and pull through the 5 loops on your hook. Chain 1.

Racimo de inicio (el primero de la vuelta): Haz 3 cadenetas, coge hebra y entra en el mismo punto. Coge hebra otra vez y saca una lazada. Coge hebra y sácala sólo por las dos primeras lazadas del gancho. Repite esta misma acción 2 veces más hasta tener 4 lazadas en el gancho. Coge hebra y sácala por las 4 lazadas que tienes en el gancho. Haz una cadeneta.
Racimo normal (el resto de racimos): Coge hebra, inserta el gancho en el siguiente espacio de una cadeneta, saca una lazada. Coge hebra de nuevo y sácala por las dos primeras lazadas en el gancho. Repite esto 3 veces mas, hasta tener 5 lazadas en el gancho. Coge hebra y sácala por las 5 lazadas que tienes en el gancho. Haz una cadeneta.


I made this tutorial some years ago, but for one reason or another I never published it. But now I feel it's the right time to do it for this issue has become somethig really important in my life and I'd love to share a little bit with all of you.

I really hope you enjoy it and find some inspiration on it.


Hace años que preparé este tutorial, pero entre unas cosas y otras no lo había publicado. Hoy se ajusta totalmente a mis esfuerzos por reducir el consumo y aumentar la conciencia, por ello he decidido compartirlo con vosotras.

Espero que lo disfrutéis y que os sirva como inspiración.

Podéis encontrar más tutoriales aquí.
Related Posts Plugin for WordPress, Blogger...