Showing posts with label Tapestry Crochet. Show all posts

February 9, 2020

Purse crochet cover

Do you know this feeling, when you suddenty have the urge of finishing all your UFOS? Of course you know it, we all know it. As well as we know that this feeling just lasts a few days, maybe weeks. Make it a month, maybe two if you're very well determined... but I seriously doubt it lasts more than that.

Well, this is what I'm experiencing right know. All my yarn boxes and project bags are a mess but I'm feeling so Marie Kondo that I'm trying to fix that mess. Will I make it? Don't think so, but at least I'll try.

El espíritu del orden y la organización se ha apoderado de mí. No hice propósitos de año nuevo, hice propósitos de vida nueva y estos conllevan organizar el caos lanero y terminar todo lo que tengo a medias. ¿Os suena esto de algo? 

Laura Algarra lleva un tiempo ayudándonos con su "dieta de ovillos" por lo que yo he empezado a poner en práctica mis patrones de aprovechamiento, terminando proyectos pendientes con los restos de lanas que rondan por mi casa. ¿Lo conseguiré? Pues no creo, pero por lo menos durará unas semanas y algo haremos.


So in one of those little bags full of don't-know-exactly-what I found 2 ugly old purses that I bought a few years ago pretending to cover them with cute tapestry crochet. And today, my ladies, the day has arrived. No more wondering-around is allowed. Open all your drawers and bags and look for an old purse that could need a make over.

Haciendo orden encontré unas viejas carteras que conservaba con la intención de forrarlas y darles una nueva vida, mucho más chic y glamourosa. Hacía ya más de 2 años que estaban guardadas... "Ay, tengo que hacer esto. Ay, tengo que terminar aquello" Así todo el día. Se acabó. Ha llegado el momento. Los monederos se hacen hoy. Así que ponte a buscar por tu casa antiguos neceseres, monederos, carteritas... y ¡manos a la obra!


WHAT WILL YOU NEED?
- A purse
- Cotton yarn scraps (I've used Scheepjes 8)
- Crochet hook (If you're crochetting tapestry try with a smaller hook than recommended, I'm using 2mm)
- Tapestry needle
- Sewing thread and needle
- A nice and sweet afternoon snack and a hot beverage just to make the whole experience even better.

¿QUÉ NECESITARÁS?
- Monedero
- Restos de algodón (Yo he usado restos de Scheepjes 8)
- Aguja adecuada para  el material que hayas escogido. (Si vas a hacer tapestry, mejor usa una aguja medio punto o un punto menos a la indicada, yo he usado una de 2mm)
- Aguja lanera
- Aguja e hilo de coser
- Merienda rica para hacer la experiencia aún más perfecta.


Picnic pattern:
The foundation chain should be multiple of 8 and it has to be as long as twice the base of the purse. In my purse I needed 32 chains to reach the lenght of the purse, so my foundation chain is 64. It's better to make it a little larger than the purse, 1 or 2cm, because the tapestry tends to stretch too much.
Now add 1 more chain.

Para el estampado Picnic:
Teje una cadeneta múltiplo de 8 igual de larga que el doble de la base del monedero. En mi caso con 32 cadenetas alcanzaba la longitud de la base del monedero por lo que hice 64. Es recomendable que sea por lo menos 1 o 2 cm mayor que el monedero, ya que al tejer en tapestry se encoje mucho.
Ahora añade una cadeneta más.

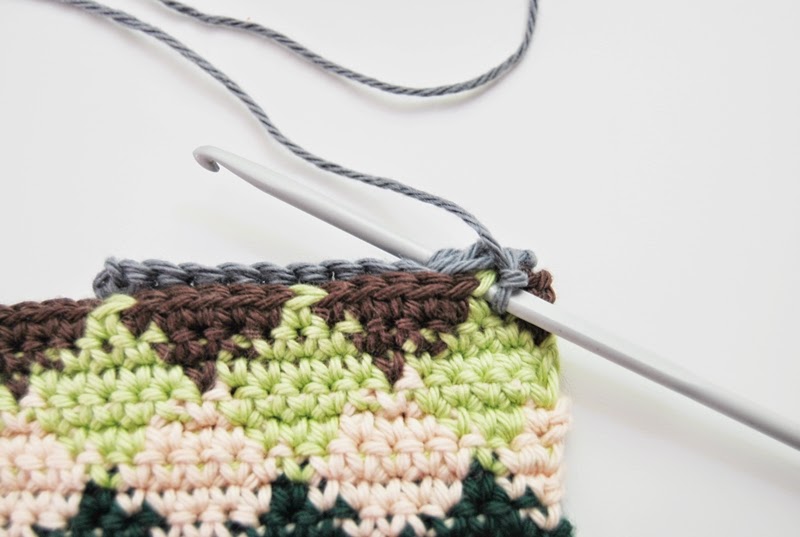
First thing to know about tapestry crochet is how to change colour: You should close the last stitch always with the new colour. That's to say, as you can see in the picture, if you're working with the pink thread, close the last stitch with the brown thread, and then keep working with brown.
Tapestry crochet is always worked with two or more colours, but instead of fasten them off each time you change, you have to keep carrying them, hidden inside the single stitches. Even when you change rows.

La técnica de Tapestry permite crear dibujos combinando diferentes colores en una misma fila. Para ello interpretamos cada punto como si fuese un píxel o uno de los cuadraditos en un papel cuadriculado. Es importante tener en cuenta que el cambio de color se hace cerrando el último punto de un color con el siguiente color a usar. En el ejemplo vemos como vamos a cambiar de blanco a turquesa por lo que el último punto en blanco lo cerramos ya con turquesa. El color que no se está usando irá siempre metido entre los puntos, es decir, se teje envolviendo la hebra.
This pattern combines 4 row blocks, alternating 4 white stitches and 4 turquoise stitches or 4 turquoise stitches and 4 navy blue stitches. Switch colors every 4 rows, as you can see on the picture below, until you reach the purse heigth. Remember always to start the rows with 1 chain.
Now you can embroider some flowers.

Este estampado combina bloques de 4 filas, alternando 4 puntos blancos con 4 puntos turquesa o 4 puntos turquesa con 4 puntos azul marino. Ve cambiando cada 4 filas, según muestra la foto, hasta alcanzar la altura del monedero. Recuerda siempre empezar las filas tejiendo una cadeneta.
Ahora puedes bordar unas florecitas si te apetece darle más aspecto primaveral. Son unos puntos muy básicos de bordado, ¡anímate a probarlo!


Once your piece is finished, fastened off and embroidered, fold in half and using the tapestry needle sew the base and the side, forming a small bag.

Una vez terminado, rematado y bordado tu rectángulo, dóblalo por la mitad y con la aguja lanera cose el lateral y la base formando un saquito.


Insert now the purse inside the little crochet bag you've formed and using the sewing needle and thread, sew it to the zipper.

A continuación mete el monedero en el saquito de ganchillo y con el hilo y aguja de coser cose todo el borde a la cremallera. Como ves, no puede ser más fácil.


For the other version of gingham, your foundation chain should be multiple of 10. Switch every 5 rows and make blocks of 5 stitches. As you can see there are blocks mixing red and navy blue. Just make one stitch in each color and make it the other way around in the next row.

Esta otra variante de cuadros de vichy está hecha con una cadeneta base de múltiplos de 10. En este caso los cadraditos son de 5 puntos en lugar de 4, y en los cuadrados en los que se mezcla el azul con el rojo se teje un punto de cada color, alternando en cada fila. Cambiamos cada 5 filas. Sigue el esquema que ves en la foto, es muy sencillo.


Try all kind of patterns and combinations of squares and rows. Gingham combinations are endless and always beautiful. And tapestry crochet offers an excellent finishing.

Prueba todo tipo de estampados y combinaciones de cuadros y filas. El vichy es infinito y siempre precioso y la técnica de tapestry crochet nos permite imitarlo y conseguir muy buenos resultados.


Now that you're an expert you can step up a level and try your new skills making this super easy amigurumi, Picnic Cat. It's also a very nice project in order to finish scraps of yarn that you have at home, since you can use any size of hook, any kind of thread. It'll always look good.


Y si te has quedado con ganas de practicar el estampado Picnic, puedes continuar con el Gato Picnic, también genial para acabar con restos de algodones que tengas por casa ya que lo puedes tejer en cualquier tamaño y con cualquier material. ¡Siempre queda bonito!. Encontrarás el patrón aquí (también incluye los banderines) y está disponible en español, inglés, francés, italiano, alemán y holandés.

December 31, 2015

Crocheting a new year

The 31st of December and your birthday are magic days. Both days are like and end and a beginning of something, days of meditation and review. On your birthday it's just you who feel this energy but on the 31st of December millions of people get to share similar feelings. You can feel it in the air. The end of the year, the beginning of a new adventure...

El día 31 de diciembre es uno de esos días mágicos, como el día de tu cumpleaños. Ambos días se presentan como un principio y un fin, un momento de balance y reflexión. Pero, así como el día de tu cumpleaños es más íntimo y sólo tú sientes esa energía, el día 31 de diciembre millones de personas de todo el mundo compartimos sentimientos parecidos. Se respira en el aire. El año se acaba. Empieza la nueva aventura.


The New Year's Eve comes with a feeling of hope. For those who had a bad year it's a release, it's finished and a new opportunity can grow; on the other hand, if you had a good year it's a renewal, new energies to start again, even stronger. A fresh start, new year's resolutions. Positive messages surround us, and this is something good from time to time.

El cambio de año viene acompañado de una sensación de esperanza. Para los que han tenido un mal año es una liberación, por fin se acaba este año maldito y nace una nueva oportunidad; si has tenido un buen año es una renovación de energía y ganas de empezar con más fuerza aún. Borrón y cuenta nueva, listas de propósitos para el nuevo año. Los mensajes positivos nos rodean, y viene muy bien de vez en cuando.


I had a good year. I bid farewell to 2015 very grateful and looking forward to go on and I welcome 2016 with strength to get over the things that went wrong. So, I'd like to take this moment of massive meditations and reviews to thank you. Most of the great moments of the year happened because of you. Your support, your interest on my work following my blog, buying my patterns, participating on the CALs... This is really moving and makes me feel very, very happy. THANK YOU!

Yo he tenido un buen año. Me despido del 2015 muy agradecida y con ganas de avanzar y recibo al 2016 con fuerzas para superar las cosas que han ido mal. Así que aprovechando este momento de balances y reflexiones multitudinarias, os doy las gracias. Las mayores alegrías de este año han sido gracias a todos vosotros. Todos los que os habéis interesado por mi trabajo, siguiendo el blog, participando en los CAL, comprando mis patrones, escribiéndome mensajes... Es realmente emocionante y me siento muy feliz. GRACIAS!


And now, as it should be, here you have a quick review of the year. The best moments according to the statistics ;)

Y ahora, como no podía ser de otra forma, voy a hacer un repaso de los mejores momentos del año, por lo menos según las estadísticas ;)

These have been the most visited free patterns on my blog:

Estos son los patrones gratuitos que más visitas han recibido en el blog:


The most liked pattern on my shop:
El patrón de mi tienda que más os ha gustado es:


And, last but not least, my favourite project of the year:

Y, por último, mi proyecto favorito del año ha sido, sin duda:


Thank you! My best wishes for the new year!

Gracias a todos! Os deseo un gran año lleno de alegrías. Habrá cosas malas, seguro, no nos engañemos, pero cuantas más alegrías tengamos mejor podremos llevarlo. Fuerza!

FELIZ 2016!

September 1, 2015

Proyecto Colcha 2.0, "Racing Flag"

THE BLANKET PROJECT
(Crochet along)

WEEK 12


Only one square to go, guys! I've already finished my blanket and I'm working on the "joining and edging" posts . I have to confess that I've already used my blanket for a little nap on the sofa, and .... it works! It's the best nap-on-the-sofa-blanket ever!

Today's technique is tapestry crochet. It's quite easy and consists on working with two or more colours at the same time, creating shapes and drawings, by carrying the thread that you're not using inside the stitches. Our pattern ir very simple, a checkboard pattern combining 2 colours. I've named it "Racing Flag" because it reminds me of the car racing flags.

Llegamos ya a la penúltima de nuestras aplicaciones. Yo ya he terminado mi colcha y estoy preparando los posts para enseñaros a unir los cuadrados y para hacer la puntilla. Y tengo que confesaros una cosa.... ya la he estrenado con una maravillosa siesta en el sofá... y funciona! Es la mejor colcha para siestas en el sofá que he probado nunca!

Hoy vamos a ver una de las técnicas que más me pedís, el tapestry crochet. Es muy sencilla, y consiste en la alternancia de colores formando formas o dibujos, manteniendo el hilo que no estás usando envuelto, con puntos bajos, por el que estás usando. He escogido un dibujo simple, en forma de damero, que combina cuadrados de dos colores. Le he llamado "Racing Flag" ya que me recuerda a las banderas de las carreras de coches.


First thing to know about tapestry crochet is how to change colour: You should close the last stitch always with the new colour. That's to say, as you can see in the picture, if you're working with the pink thread, close the last stitch with the brown thread, and then keep working with brown.

Lo primero que debes saber cuando trabajas tapestry crochet es el cambio de color. El cambio se realiza antes de cerrar el último punto del color anterior. Como ves en la foto, estábamos trabajando en rosa, y el cuarto y último punto lo cerramos con el siguiente color con el que queremos trabajar, en este caso el marrón.


Tapestry crochet is always worked with two or more colours, but instead of fasten them off each time you change, you have to keep carrying them, hidden inside the single stitches. Even when you change rows.

En tapestry crochet siempre trabajarás con 2 o más hilos a la vez, pero en vez de ir cortando los que no usas, los vas arrastrando, envueltos por los puntos bajos que realizas con el hilo en el que estás trabajando en ese momento. En la primera foto pasamos de trabajar con el rosa a trabajar con el marrón, pero mantenemos el rosa envuelto con los puntos bajos marrones. 

En la segunda foto vemos como empezamos una nueva fila, en la que seguimos trabajando en marrón y escondiendo el rosa que arrastramos ya escondido desde la fila previa.


Foundation row: With brown, chain 29
1st row: 4 single crochet (sc) in brown, 4 sc in pink, 4 sc in brown, 4 sc in pink, 4 sc in brown, 4 sc in pink, 4 sc in brown. (28 sc)
2nd to 4th row: Repeat 1st row.
5th row: 4 sc in pink, 4 sc in brown, 4 sc in pink, 4 sc in brown, 4 sc in pink, 4 sc in brown, 4 sc in pink.
6th to 8th row: repeat 5th row.
Keep repeating from 1st row until you have a square. I needed 32 rows, you may need more or less

Cadeneta base: Con marrón, 29 cadenetas
1ª fila: 4 puntos bajos (pb) en marrón, 4 pb en rosa, 4 pb en marrón, 4 pb en rosa, 4 pb en marrón, 4 pb en rosa, 4 pb en marrón. (28 pb)
Filas 2 a 4: Repetir fila 1
Fila 5: 4 pb en rosa, 4 pb en marrón, 4 pb en rosa, 4 pb en marrón, 4 pb en rosa, 4 pb en marrón, 4 pb en rosa.
Filas 6 a 8: Repetir fila 5
Repetir desde la fila 1 hasta que consigas un cuadrado. En mi caso fue hasta la fila 32, pero puede que en tu caso necesites más o menos.

Now make one in salmon and blue, another one in yellow and brown and the last one in turquoise and red.
Ahora haz uno en salmón y azul, otro en amarillo y marrón y uno más en turquesa y rojo:


Remember using #proyectocolcha hashtag if your sharing your crochet squares on instagram!

Recuerda usar el hashtag #proyectocolcha si vas a compartir tus aplicaciones en instagram!


That's all folks! Another crochet square coming soon, you're gonna love it!
Crochet up and send me pictures!!!!

Pues esto ha sido todo por hoy. Dentro de poco una aplicación nueva que os va a encantar, ya veréis!
  Tejed mucho y enviadme fotos!!!!

Do you want to join our crochet along? Then do it!

Quieres participar en nuestro crochet along? Pues hazlo!

August 22, 2014

Tapestry crochet notebook, tutorial and pattern

How to make a crochet notebook cover

A few weeks ago I showed you the tapestry crochet notebook covers we were making in Proyecto Colcha Amsterdam. As some of you wanted to know more about how we made them, here you have some pictures and notes about the procedure. You'll see how easy it is. Make a bigger one, cover your favourite book and you´ll be ready for a good beach read this summer ;)

Hace unas semanas os enseñé las libretas de tapestry crochet que estamos haciendo en Proyecto Colcha Amsterdam y os gustaron tanto que me habéis pedido que os enseñe cómo hemos hecho las fundas. Es muy sencillo, así que creo que con unas pocas fotos ya vais a entender el sistema. Si la hacéis mas grande podéis forrar el libro que os llevéis a la playa este verano ;)


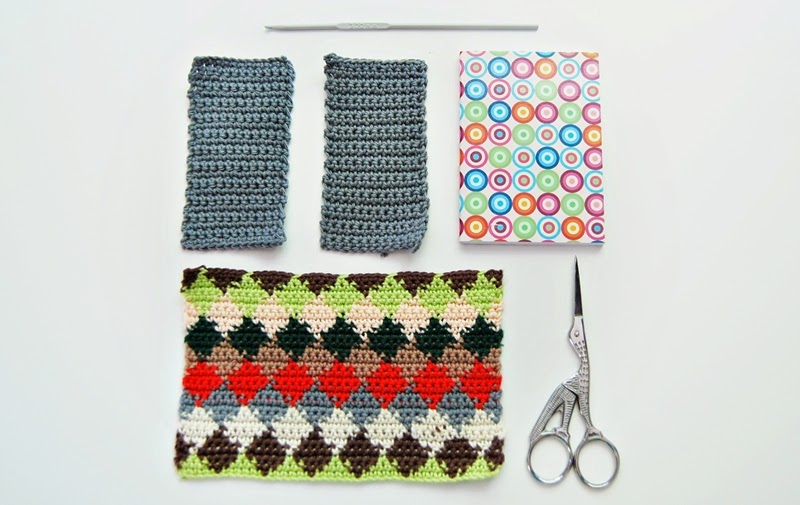
Para empezar, tejemos 3 piezas independientes. La primera será la pieza exterior, de la misma medida que la libreta abierta, y, en este caso, siguiendo el patrón de tapestry que encontraréis a continuación. Las otras dos piezas son las dos solapas interiores, un poco más pequeñas que la tapa de la libreta.

First of all I've worked three pieces: The front piece with the tapestry pattern as big as the notebook fully open, and two small pieces, a little bit smaller than the notebook closed.


Una vez hemos tejido las 3 piezas sueltas, las presentamos, superponiendo las dos piezas menores sobre la parte de la pieza grande que queremos que quede en el interior (aunque en el tapestry crochet las dos caras del trabajo suelen ser casi iguales, siempre hay una que nos gusta más. Pon las solapas sobre la que menos te guste). A continuación tejemos un borde de punto bajo alrededor de toda la pieza frontal, uniendo las solapas en los trozos que corresponda.

Once you have crocheted your 3 pieces, choose one side of your front piece to be at the outside and face the 2 smaller pieces to the inside side, as you can see in the photo above. Now you just have to crochet a single crochet border all around the front piece attaching the two smaller pieces when necessary.


Ahora sólo queda meter tu libreta en la funda de ganchillo, y a escribir! Llévala siempre en el bolso contigo :)

And you're done! Just insert your notebook in the crochet cover and start writing your TO DO list :)


Here you have the small diamonds pattern that I've designed to make this crochet notebook. Add as many chains as you need to adapt it to your own project.

Este es el patrón de tapestry crochet que he diseñado para esta libreta. Añade tantas cadenetas como sea necesario para adaptarlo a tu propio proyecto.


Do you love tapestry crochet as much as I do? Follow my pinterest board!

More pics in instagram!


July 20, 2014

Tapestry Crochet small triangles


Last week was the "Tapestry Crochet Week" in Proyecto Colcha Amsterdam. I love this technique because it's almost like painting with yarns. All you need is a plotting paper, a bunch of crayons and... let the party begin!

La semana pasada, en Proyecto Colcha Amsterdam, hemos dado las primeras pinceladas de Tapestry Crochet. Esta técnica es una de mis preferidas, porque prácticamente te permite dibujar con las lanas. De pequeña ya llenaba las libretas cuadriculadas con cenefas de triángulos, rombos y otros dibujos geométricos, y ahora puedo hacerlo con la aguja. 


Un papel cuadriculado, unos lápices de colores y... empieza la diversión! En este enlace tienes un tutorial fantástico de Le Petit Paquebot para Katia, donde te explica paso a paso cómo trabajar el Tapestry Crochet.  Pruébalo, te encatará.

In this link you'll find a great tutorial about how to Tapestry Crochet by Le Petit Paquebot. You'll love it!


Aquí os dejo el patrón que he hecho para este proyecto para que podáis hacerlo vosotros también en casa. Es muy fácil, así que venga, animaos!

This is the pattern I've made for this project. Try to do it, it's so easy!!


Siempre les insisto a mis alumnas en que es importante traer una libreta para ir apuntando lo que hacemos cada semana, los patrones, indicaciones y demás, porque es imposible acordarse de todo. No suelo tener mucho éxito y la mayoría de ellas siguen sin hacerme caso, por lo que he ideado un plan que no puede fallar... Vamos a forrar una libreta con nuestro trabajo de Tapestry Crochet! Así tendrán una libreta tan bonita que querrán llevarla siempre encima. Bueno, eso espero, a ver qué pasa al final, que me las conozco...

I always ask my students to bring a notebook with them, but I'm not always succesfull, they use to forget about it... so this time I thought that if they have the cutest notebook ever, maybe they'll would like to use it! That's why we're going to cover one with our Tapestry Crochet work. Let's see what happen...


No sólo hay ganchillo en Proyecto Colcha Amsterdam. Esta vez también tuvimos salón de peluquería improvisado de manos de Ana La Peluquera. En este caso la "víctima" fue Gabi. Mirad qué maravilla de pelo y de peinado.

Not everything in Proyecto Colcha Asterdam is about crochet. This time Ana la Peluquera (one of my students and the best hairdresser in Amsterdam) cut Gabi's hair. See how amazing it looks now.


More Tapestry Crochet in instagram!


Related Posts Plugin for WordPress, Blogger...